Users & Collaborators
User Roles in Pressbooks
There are several different user types in Pressbooks, each with a different level of access to accommodate the user’s role within the team. Below are each of the user roles, and what they have access to once they’ve been added to a book, listed from most to least access.
As an author affiliated with the University of Arkansas OER program, you will be given administrator privileges for your work. The OER Librarian is an overall site administrator and will be able to make any needed changes and assist you as needed. Hourly employees supervised within the libraries may also be given Editor permissions.
Role |
Manage Users & Settings |
Add or Edit Posts |
Publish Posts |
Delete Posts |
Read Posts* |
Comment (if enabled) |
| Administrator | Yes | Yes | Yes | Yes | Yes | Yes |
| Editor | No | Yes | Yes | Yes | Yes | Yes |
| Author | No | Only their own | Only their own | Only their own | Yes | Yes |
| Contributor | No | Only their own | No | No | Yes | Yes |
| Subscriber | No | No | No | No | Yes | Yes |
*Authors, Contributors, and Subscribers can only read private posts which have been marked to “Show in Web.”
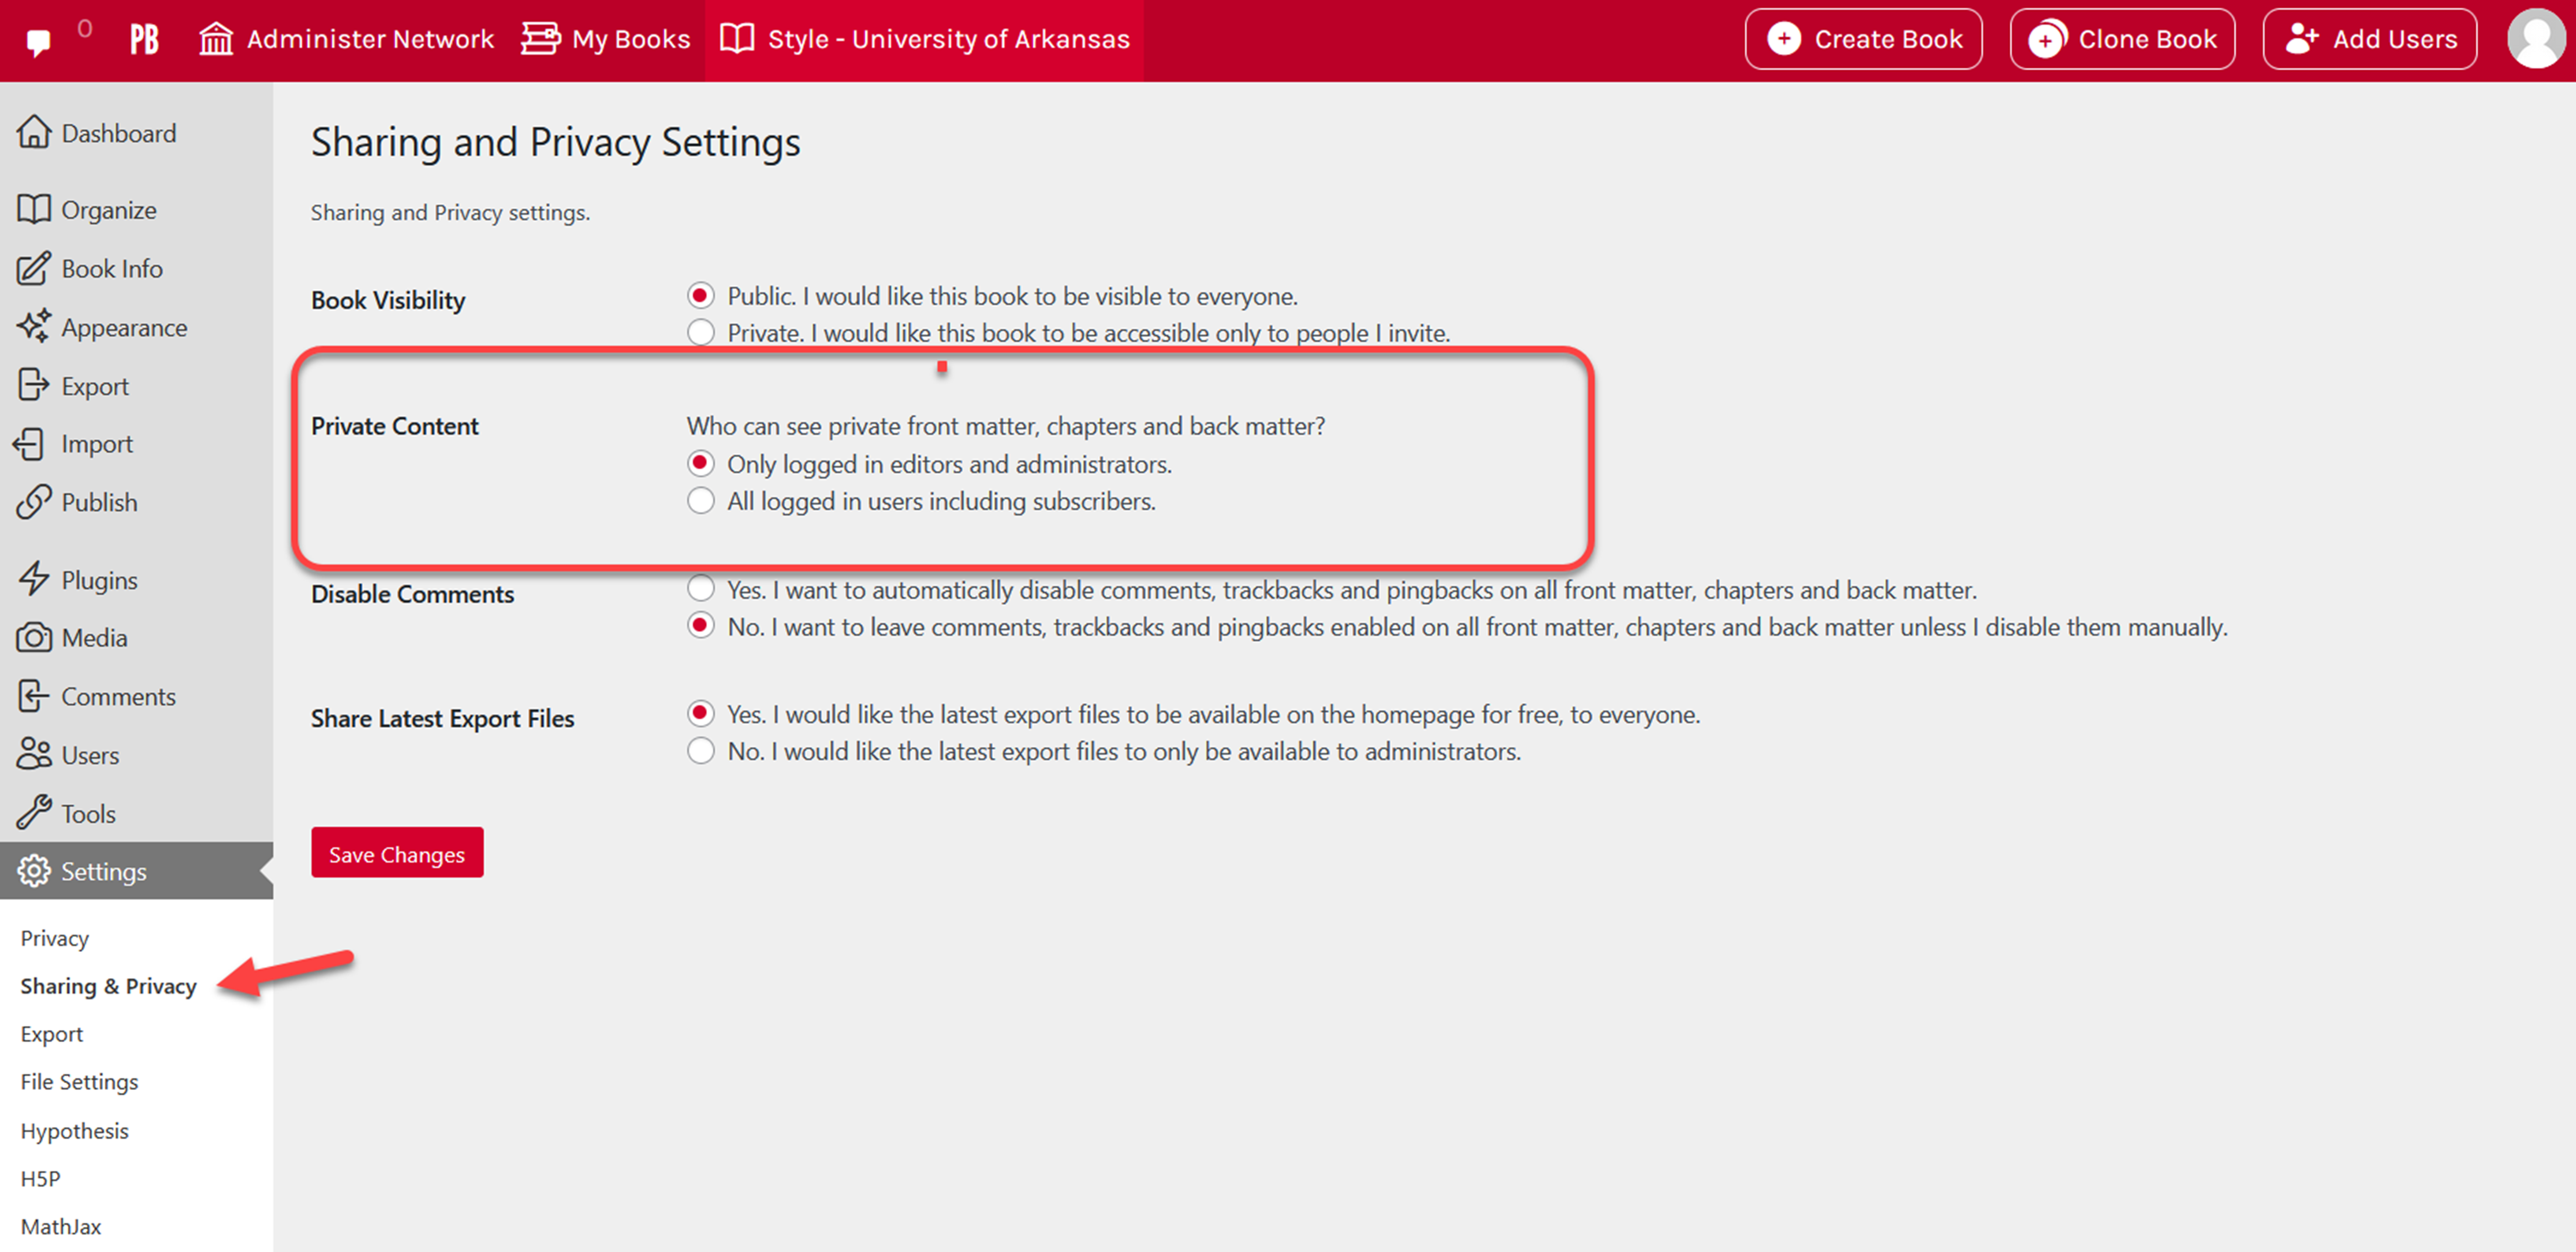
You can also choose whether all users can view chapters set to ‘Private’, or if those will be limited to Administrators and Editors. To do so:
- Hover over Settings
- Click Sharing & Privacy
- Find Private Content
This settings asks you to choose who can see private front matter, chapters, and back matter. Select either “Only logged in editors and administrators” or “All logged in users including subscribers.”
Different user roles also have access to different interfaces while within Pressbooks. See the chart below for a list of those interfaces to which each role has access.
| Dashboard Link | Administrator | Editor | Author | Contributor | Subscriber |
| Organize | √ | √ | √ | √ | x |
| Private/ Public setting (Organize) | √ | x | x | x | x |
| Book Info | √ | x | x | x | x |
| Appearance | √ | √ (but no “Themes”) | x | x | x |
| Export | √ | √ | √ | √ | x |
| Plugins | √ | x | x | x | x |
| Media | √ | √ | √ | x | x |
| Users | √ | x | x | x | x |
| Tools | √ | √ | √ | √ | x |
| Settings | √ | x | x | x | x |
| Import | √ | √ | √ | √ | x |
Adding Collaborators and Assigning Permissions
You can add existing Pressbooks users to your book, or you can create new users. If you need to add many users at once, consider using the Bulk Add feature. As a book administrator, you will always see the ‘Add Users’ option for individual books. Instructions for using each of the three ‘Add User’ options are included below.
Add Existing User
- Select the Users tab on the left sidebar menu of your book’s dashboard
- Click Add New
- Under Add Existing User, fill in the user’s account email
- Select their role
- Click the “Add Existing User” button
Users invited by this method will be sent a confirmation email requiring them to accept the invitation to be added to this book. They will not appear in the book’s user list or be able to access the project until they have confirmed their participation.
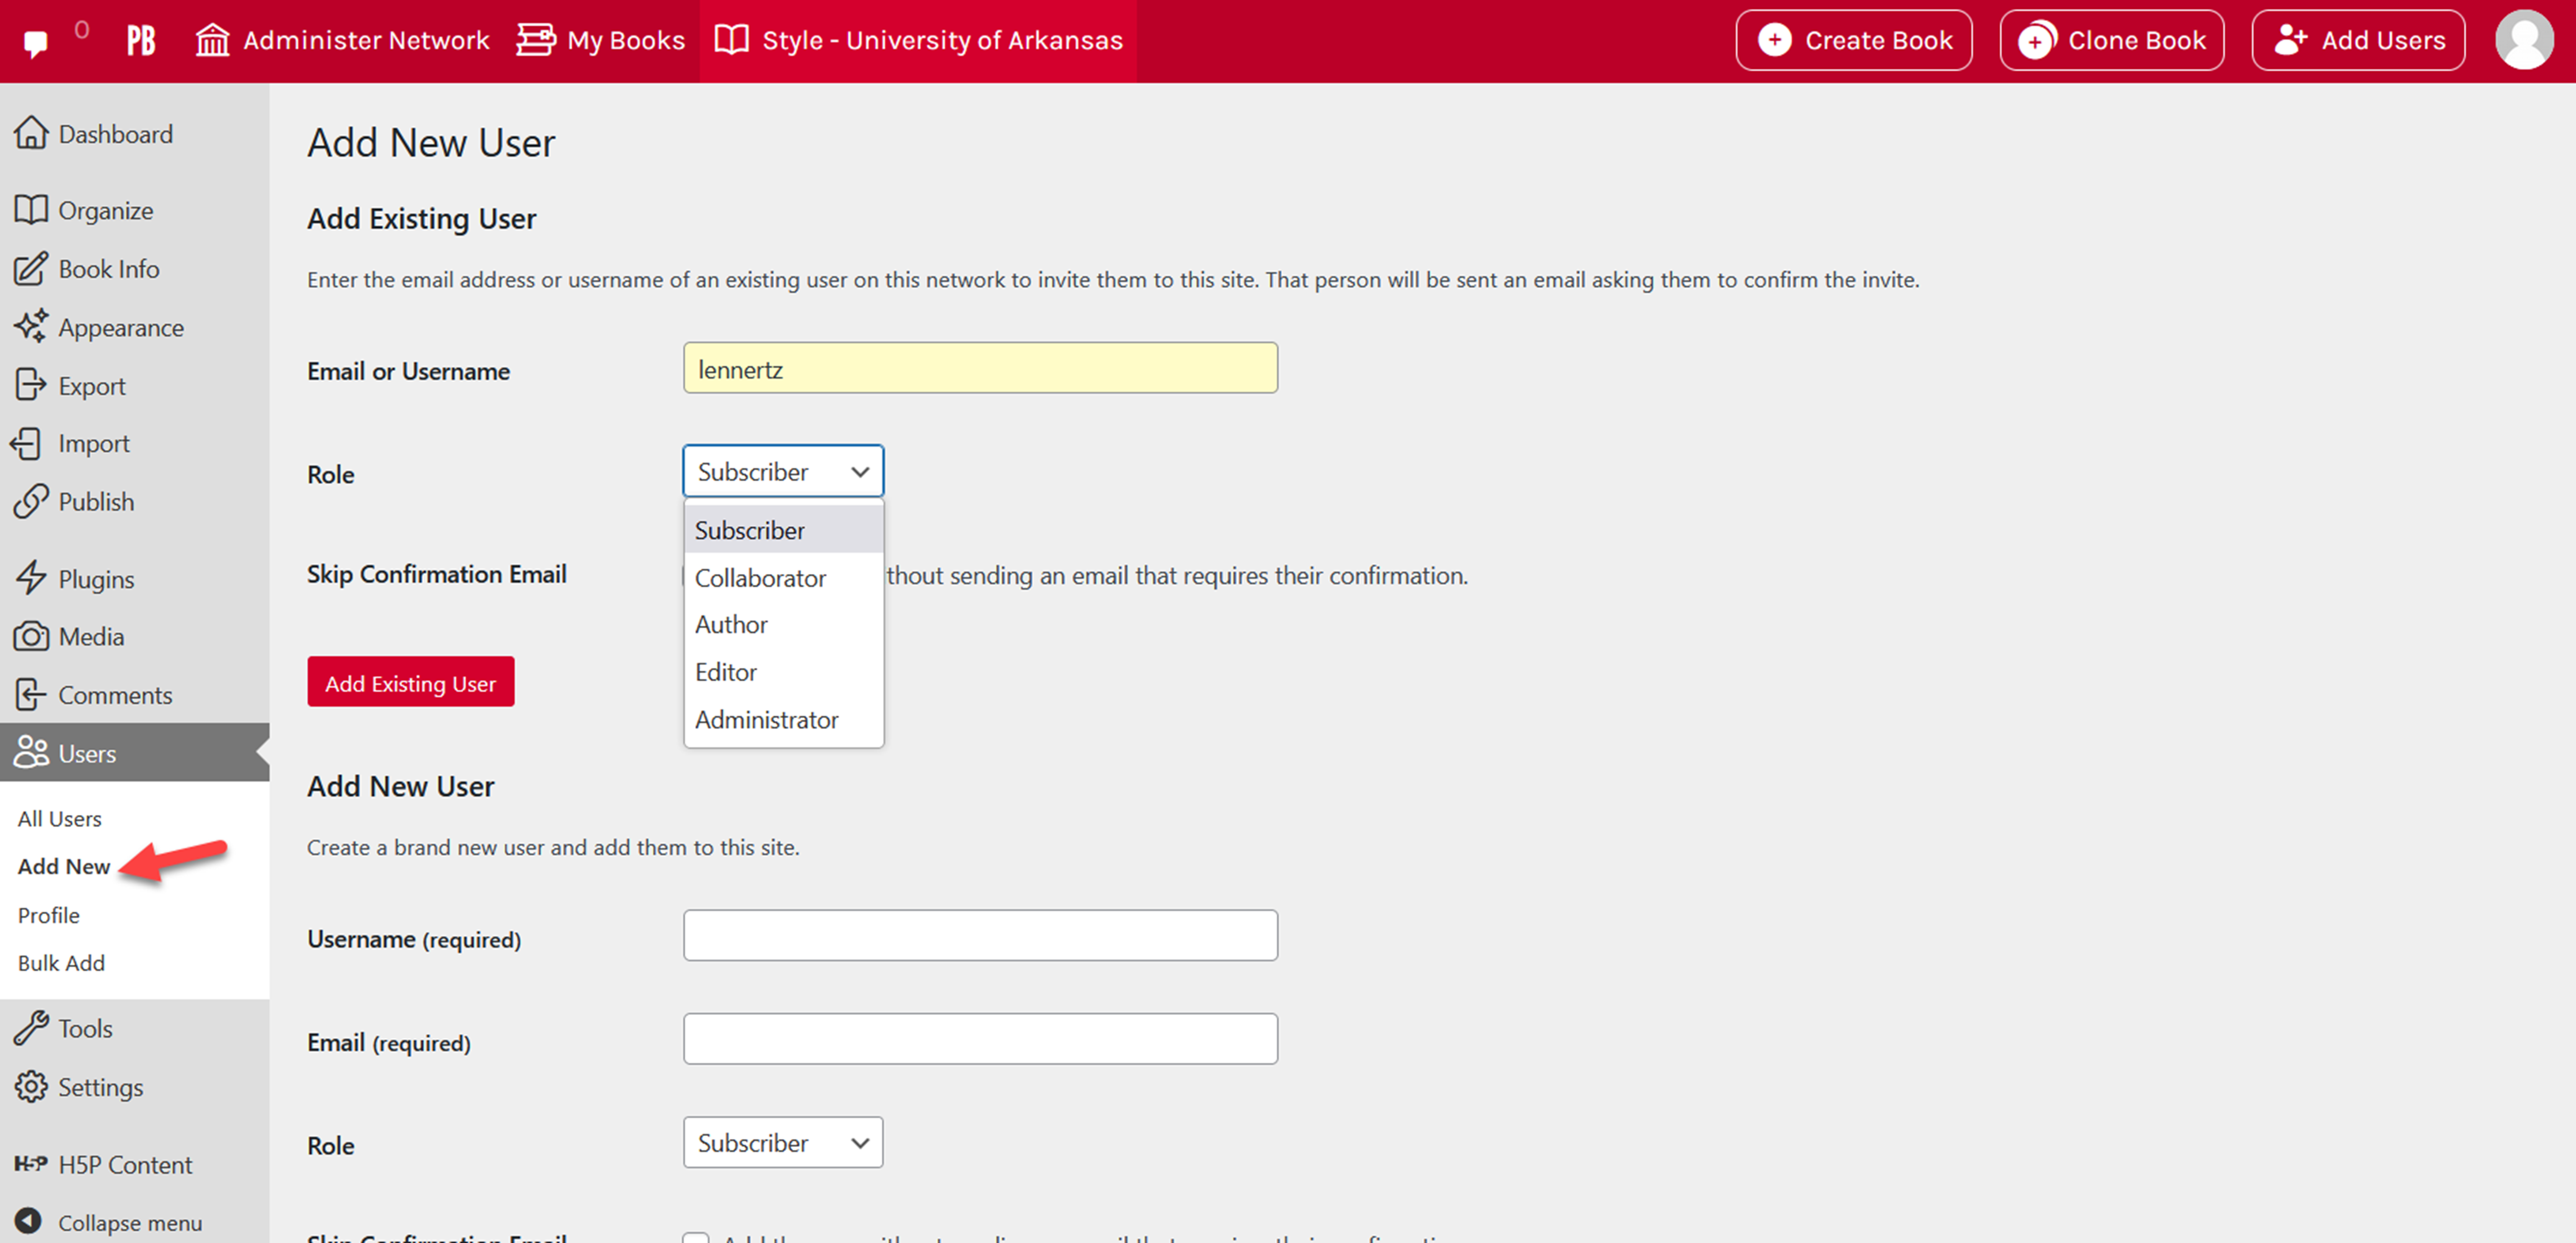
Add New User
- Select the Users tab on the left sidebar menu of your book’s dashboard
- Click Add New
- Under Add New User fill in the email address that will be linked to the user’s Pressbooks account, as well as their username in Pressbooks
- Select their role
- Click the “Add New User” button
A confirmation email will be sent to the email address you entered into the form. The new user must confirm the creation of their account before they will appear in your book’s user list and have access to the project.
Add Users in Bulk
- Select the Users tab on the left sidebar menu of your book’s dashboard
- Click Bulk Add
- Write in or paste the emails of every user you need to invite to the book with one email per line
- Select the role
- Click the “Add users” button
Note that the Bulk add feature allows you to add both new users and existing Pressbooks users to your book at the same time.
Any new users added via the Bulk Add option will be sent an email asking that they confirm registration of their account. Users will not appear in your book’s user list until they’ve confirmed their account. Existing users will immediately appear in the user list.
Note that all users entered will be given the same role. If you need to add many users to your book with different roles, you can either perform the Bulk Add operation several times, choosing a new set of users for each desired role, or you can add all users with the minimum desired permission and then bulk change user permissions after they have been added and confirmed as users.
You will receive a notification at the top of the screen that lets you know which users were added, which need to confirm their accounts before they’ll be added, and which users were unable to be added.
Managing Users and Changing Permissions
Sometimes a book administrator will want to change user permissions or delete users from a book. Follow the steps below to access the list of users on a book and change a collaborator’s status.
To access users:
- Select the Users tab on the left sidebar menu of your book’s dashboard
- Click All Users to view all users in any role on a given book
You can also use the Search Users function to search for a particular user if there are many on the book.
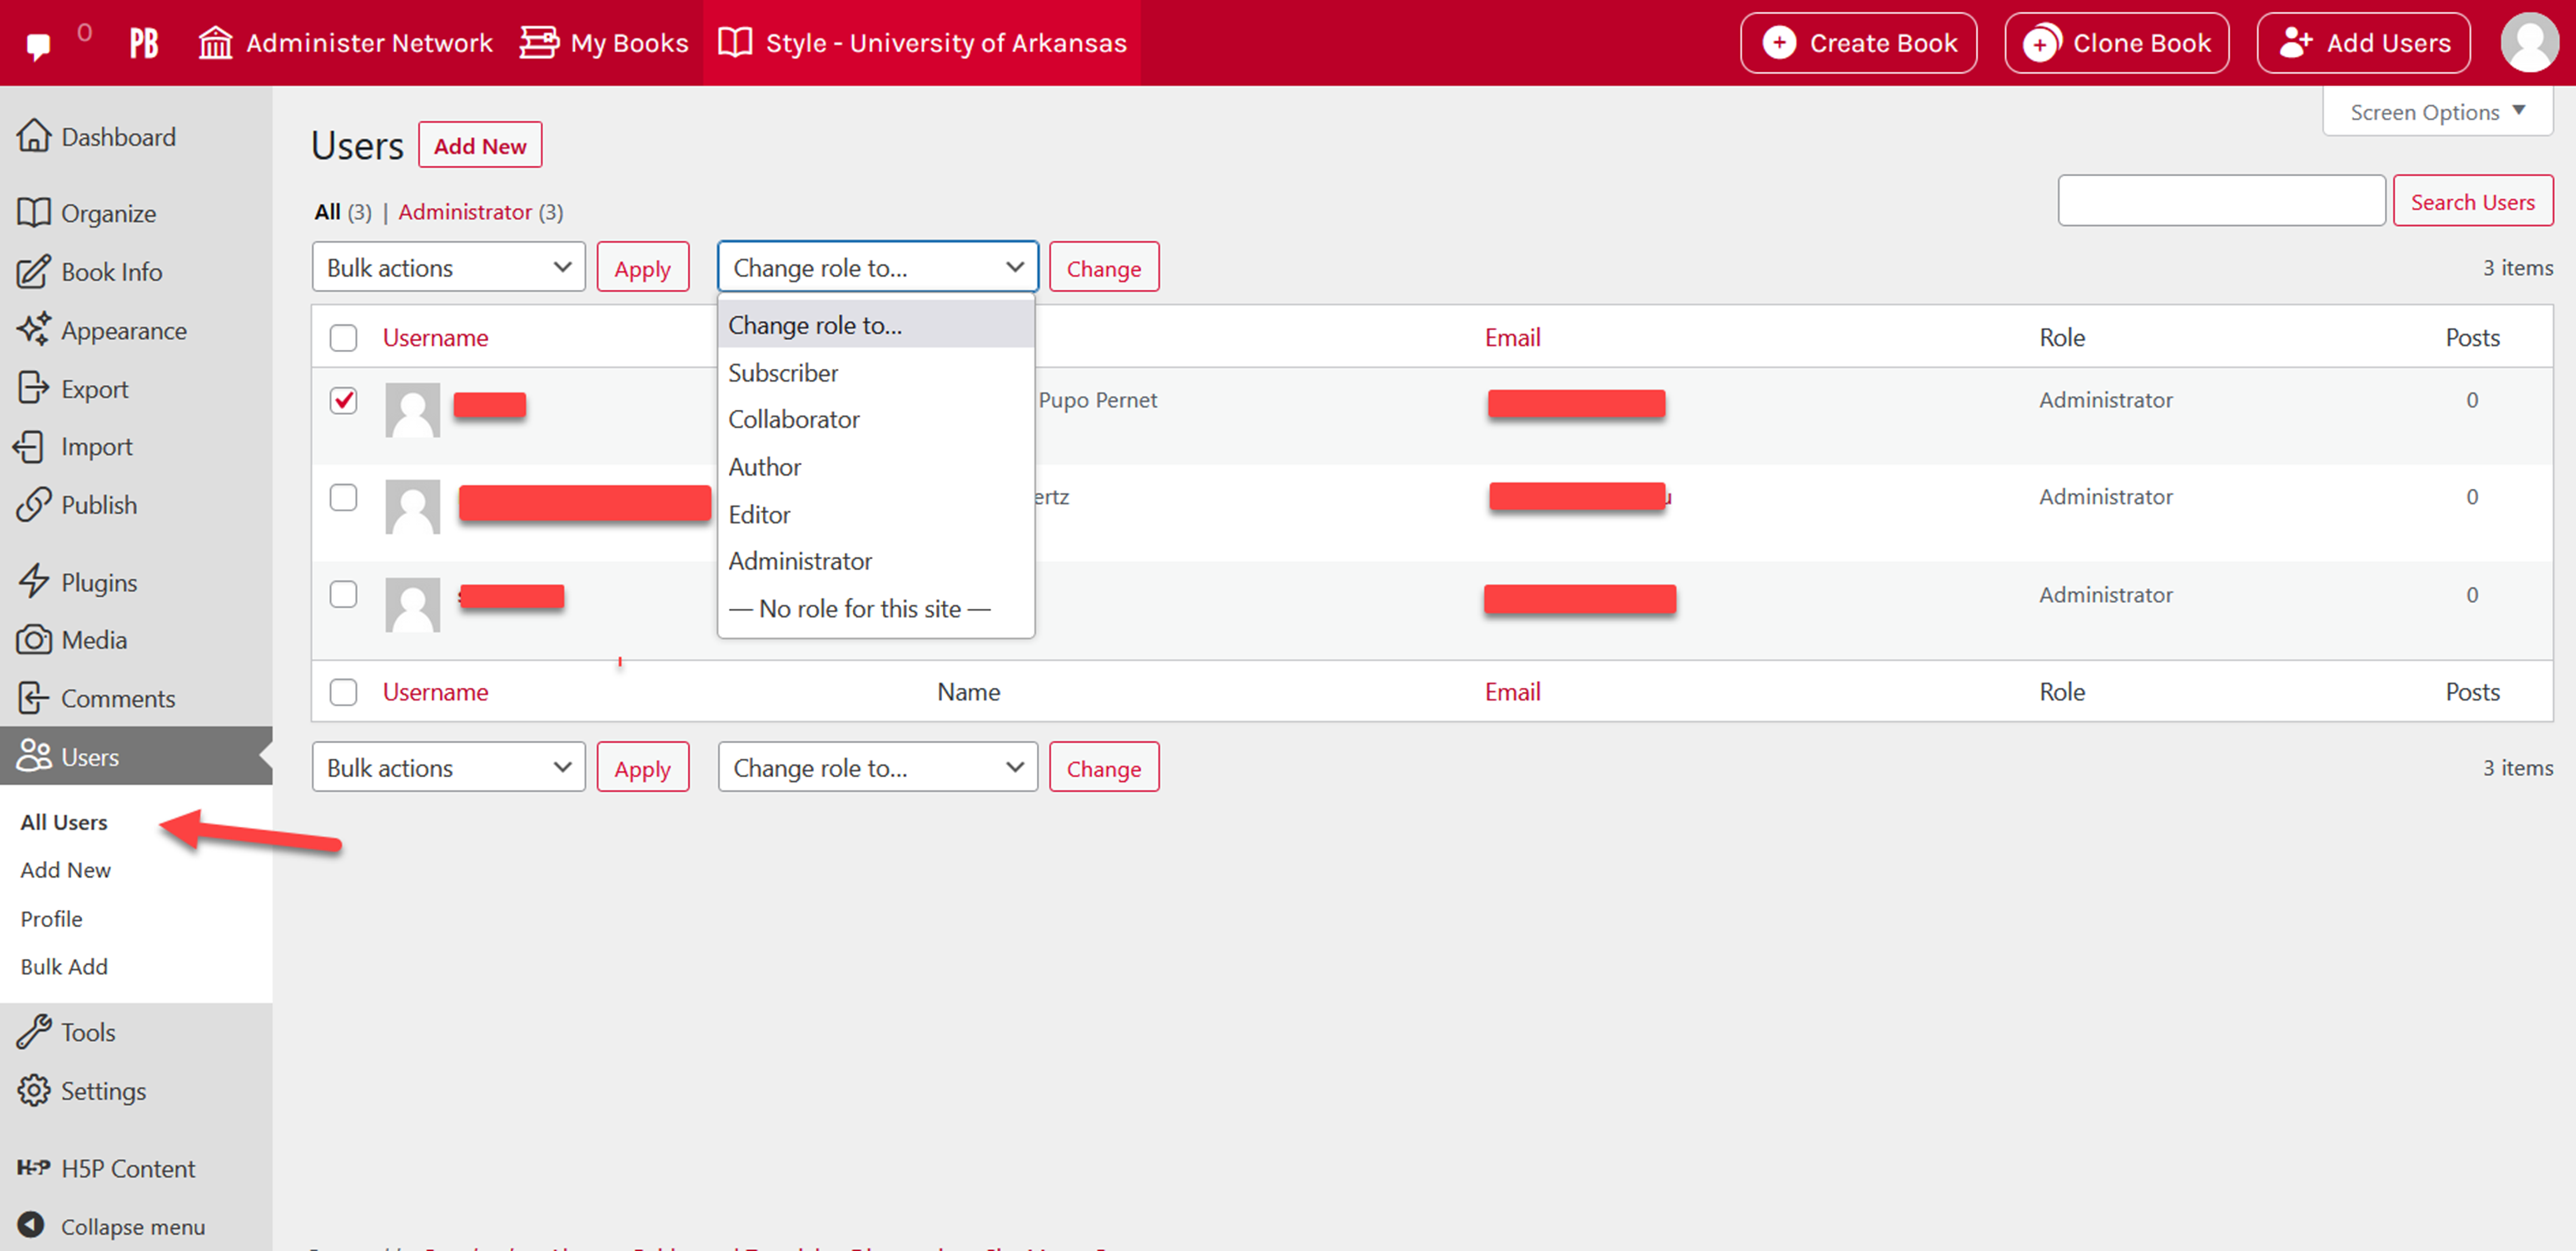
To change a user’s role:
- Select the user you’d like to change by clicking the checkbox next to their user image and ID
- Click and open the “Change role to…” dropdown menu and select the desired role
- Click Change
The user’s new permission level will be reflected in the Role column.
To remove users:
- Select the users you would like to remove (NOTE: Selecting the checkbox next to Username at the top or the bottom of the user list will select all users)
- Click and open the “Bulk Actions” dropdown menu and select “Remove”
- Click Apply
This will remove all selected users from the book.
Sharing with a Group of Readers: Password Protected Chapters
If you want to share your book with a large group of readers but not make the book open to the public, it can be impractical to add each individual reader as a Pressbooks user.
Instead, you can password protect the chapters of your public book so that only individuals to whom you have given the password can access the content. Note that there is currently no global option for this feature; you must add password protection to each chapter individually
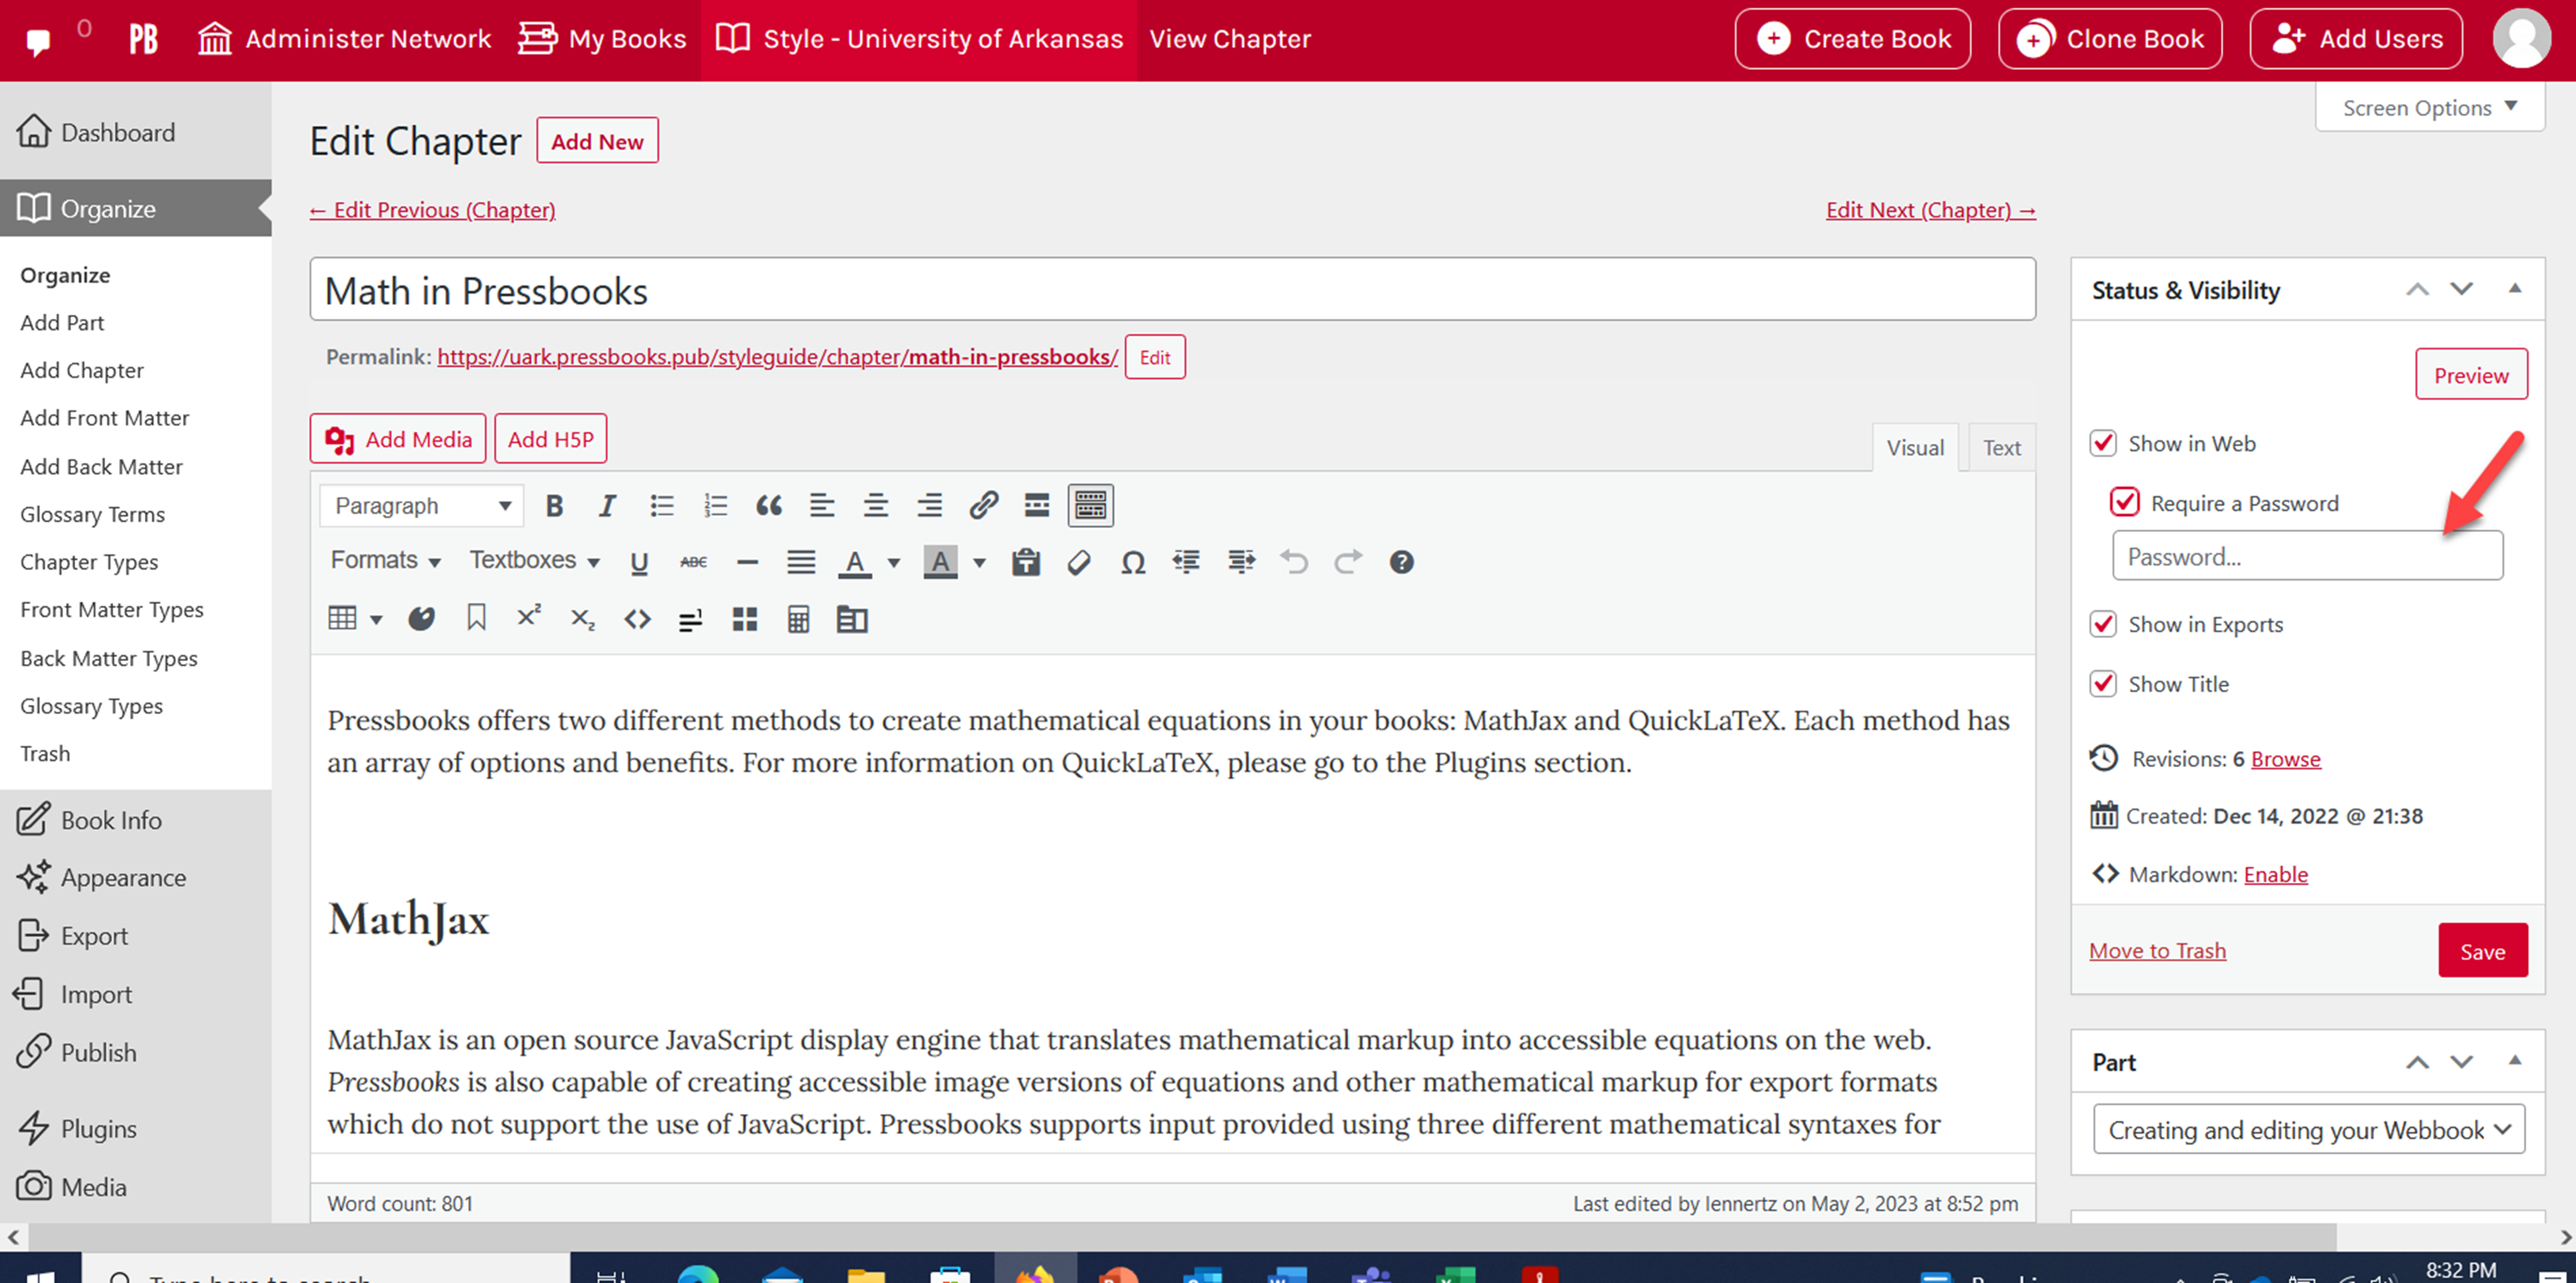
To add a password to chapter:
-
- Select the chapter you would like to add the password to
- In the Status & Visibility menu, make sure “Show in Web” is selected
- Select the checkbox for Require a Password
- Type in your chosen password
- Click Save (or, for new chapters, Create)
- Repeat for each chapter you want password protected
- Go to Organize and find the global privacy setting at the top of the page,
- Set the book’s global privacy to Public

After, your book homepage will be accessible to the public. However, each chapter when navigated to will state “Protected: [Enter Chapter Title Here]” at the top, and prompt the user to enter a password.
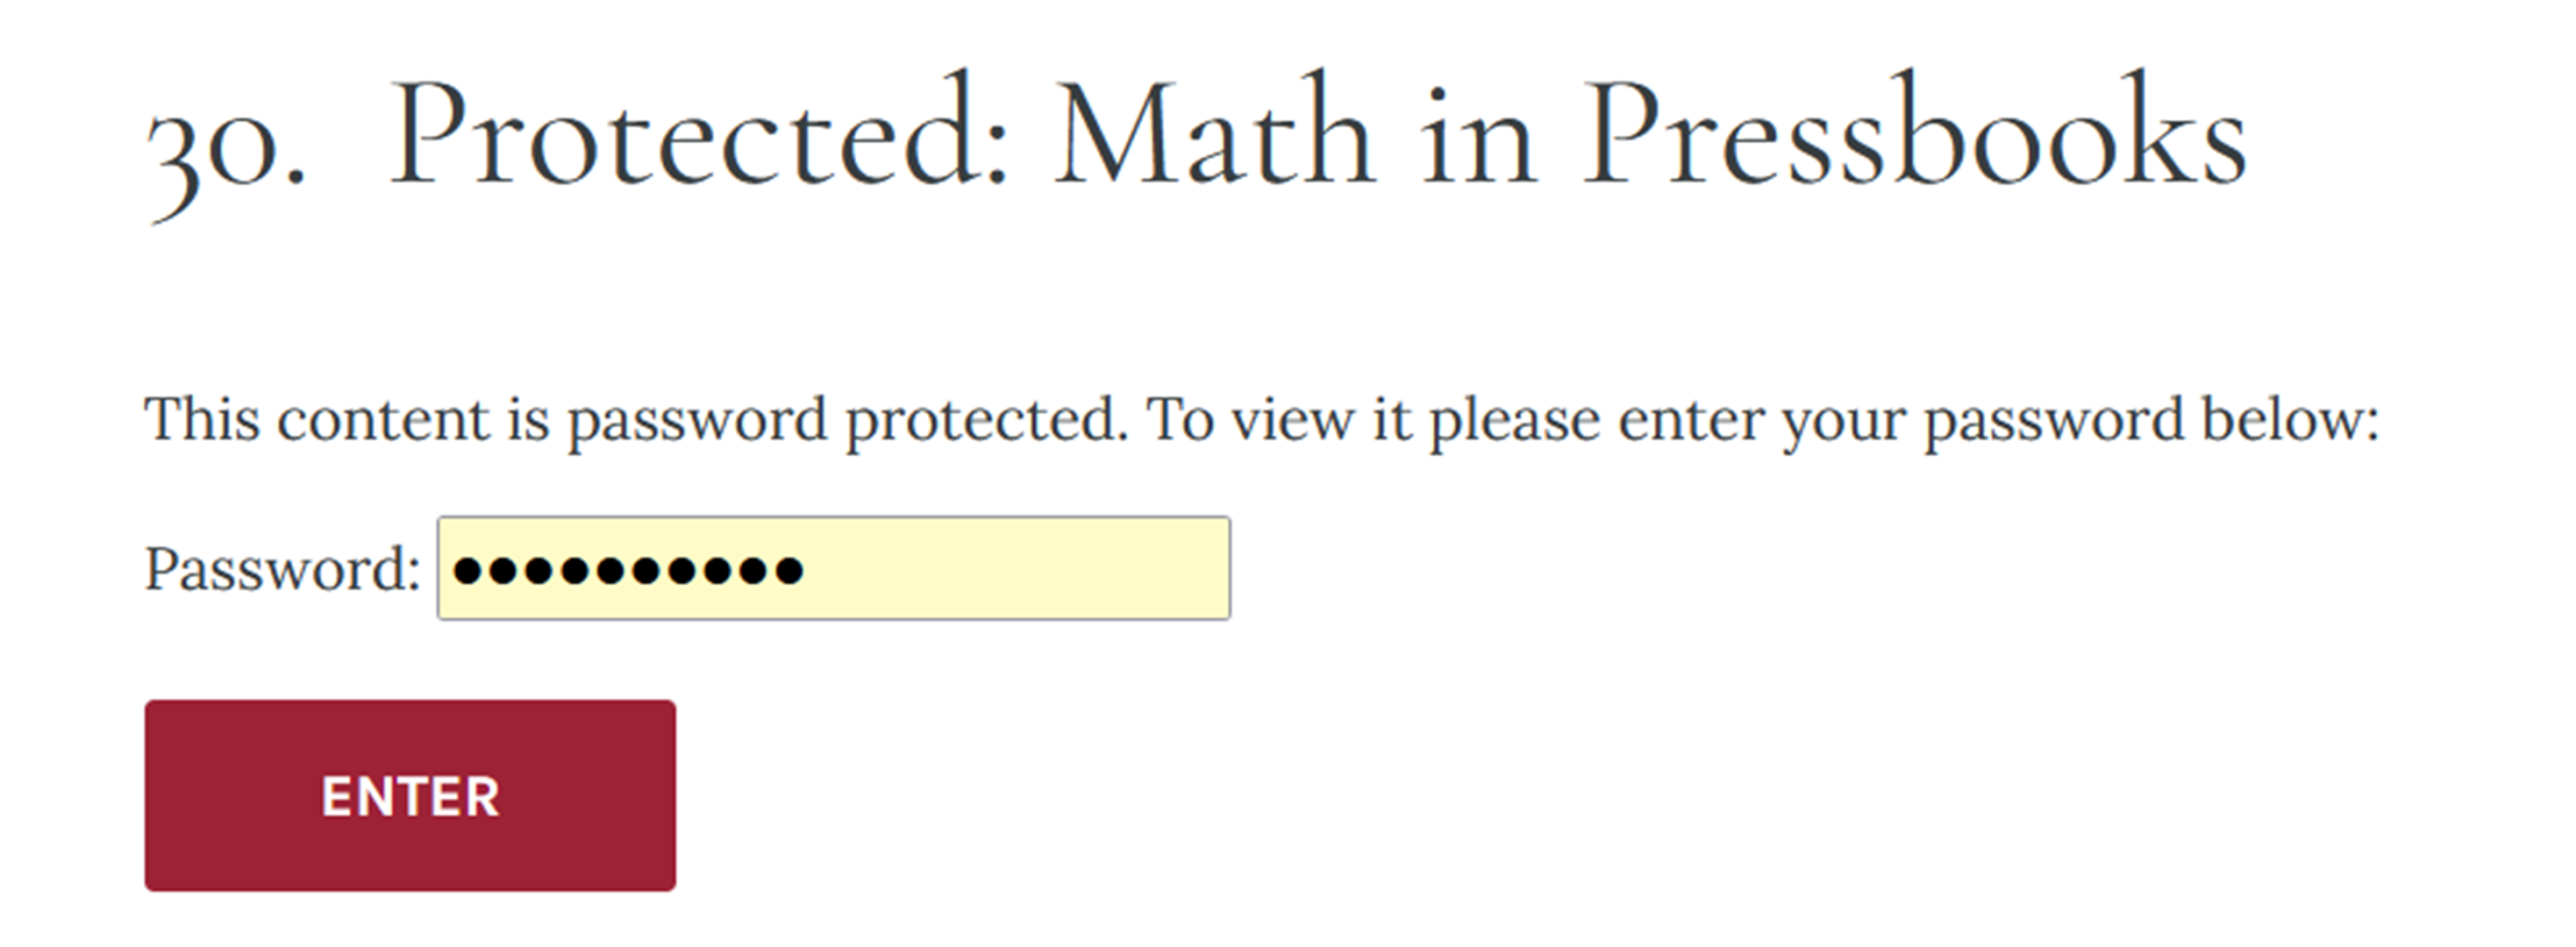
Passworded content as seen through the User Interface.
If the correct password is entered, the user will have access to that chapter.
the point of human-computer interaction and communication. This can include display screens, keyboards, a mouse and the appearance of a desktop.

Feedback/Errata