How to Get Your Book Into Pressbooks
Even if you’ve already started writing your book, it’s easy to import into Pressbooks.
Copyright and Licensing
Ways to Get Your Book Into Pressbooks
No matter where your manuscript is now–in your head, in another software or even fully produced as an ebook–there’s a way to get it into Pressbooks so you can revise, write or complete it. Here are the basics:
- No matter what stage your book is in, you can copy and paste the text manually into the Pressbooks interface. For most instances, this is the recommended method. While it takes a little more effort up front, it will preserve the formatting that will translate into an ebook (line breaks, bulleted lists, bold, italics, headings and subheads), while stripping out formatting that won’t.
- You can also write and format your book directly in Pressbooks, which is arguably simplest.
- Pressbooks will also import text from Word documents (though some reformatting and cleanup may be needed with this method). We recommend using this for books with many chapters.
- Want to go blog to book? Import your blog files from WordPress.
- If your book is already in EPUB form, you can still get it into the platform–Pressbooks will convert it back to editable form.
Importing from Word
You may import book content from a number of locations. Some of these are easy but some of these are from Word! In order for docx files to import correctly the files must be formatted appropriately. Errors with this process is one reason why copy and pasting is recommended.
Below you’ll see how to import your Word manuscript using the Pressbooks docx importer. This importer will bring in all your chapters, and basic styling (italic, bold, lists, H2, H3, paragraph breaks, etc). Note that the importer will import only BASIC styling. It should not import font choices, colors, etc. The cleaner your Word file is to begin with, the less cleanup you’ll need to do to your book in Pressbooks.
To use the MS Word importer, see instructions below.
- Prepare your docx file: First, using the Styles menu (not the formatting menu) in Word, make sure you apply NORMAL styling to the entire document; and apply Heading1 style to your chapter headings.
- In Pressbooks, go to: Left Menu/Tools —> Import.
- Select: File Type: docx
- Choose your file from your computer
- Upload
- Select which content/sections you want to import
- Decide whether the content/sections are: front-matter, chapters, or back-matter
- Import
- Arrange your chapters in the right order
- Test some exports, clean up markup, and off you go!
Notes:
- Everything other than basic styling is stripped out by design … so fancy fonts and such won’t get imported. Italics, bold etc. should.
- All chapters are imported as DRAFTs. A quick way to get this listed as published is: mark all the chapters Private, then revert to Public. This will make them “published.”
- When importing, make sure that your filename doesn’t contain any special characters as this can interfere with the process. If necessary, rename your document before uploading
Here is a short video to help you with this process.
Importing from WordPress into Pressbooks
Exporting from WordPress
In your WordPress admin, go to: Tools –> Export
(found at: ~/wp-admin/export)
Export the content you want into an XML file.
Importing into Pressbooks
Importing the File
- Go to Left Menu –> Tools –> Import
- Select WXR WordPress eXtended RSS from the dropdown menu.
- Click on “Choose File” and select the WordPress XML file you exported in the first step.
- Click on “Upload File”.
NOTE: When importing, make sure that your filename doesn’t contain any special characters as this can interfere with the process. If necessary, rename your document before uploading.
Selecting and Categorizing Posts
Once you upload the file, the next step is to select which posts you would like to import, and what kind of post they should be treated as.
- Either “Select All” or select individual posts to import
- Select which section each post should be imported as: Front Matter, Chapter, Part or Back Matter
Clean up your import
You will now see all your imported content alongside any existing posts in your book. To be sure that everything is in order, it pays to do the following:
- Check the order of the imported posts in the “Text” –> “Organize” screen.
- Double check your “Book Info” as this can sometimes be overwritten during the import process. You may have to re-enter your book details.
Book cloning from the Pressbooks Directory
We are able to easily “clone” or copy any public, openly licensed book from the Pressbooks Directory .
Use Cases for Cloning a Book
Cloning allows authors, editors, and readers to easily copy and begin editing a book for their own needs. This enables all sorts of uses for open education resources, as well as some practical ones for institutional users.
With this feature:
- Instructors can duplicate and immediately begin adapting books specifically for their classrooms
- Universities can share and disseminate their research and books easily with other institutions for quick adoption and adaptation.
What Content is Cloned
What is included when we clone a book:
- All the chapters, front matter, and back matter that were public and openly licensed in the original source book
- All the text in the above chapters, front matter, and back matter
- All the images, videos, and other media that were in the media library of the original source book and are linked from the cloned content
- Metadata associated with an image*
- The metadata in the Book Info section of the original source book
- The metadata for the media content cloned from the original source book
*Image metadata, including alt tags, titles, descriptions, and captions, will only clone when both Pressbooks networks are running version 5.5.2 or greater.
What isn’t included when we clone a book:
- TablePress tables
This content is not cloneable because as it is created using third-party plugins that do not provide for API endpoints that may be fetched into our collection.
How to Enable Source Comparison
If you’d like to let users compare between the current version of your cloned book and the current version of its source book, you can enable the Source Comparison tool. Check out the Source Comparison chapter for more information on how to do this.
Copy and Paste
While it takes the most manual effort, copy and paste is the most reliable means to get your text from external files into Pressbooks.
How to copy and paste, step by step:
- Log into Pressbooks.
- Set up Chapters and Parts to emulate the structure in place in your working manuscript document.
- From the Dashboard, go to Organize and click on the Chapter you would like to add to.
- Go to your working file and highlight the desired selection to copy in your working file. Use your computer’s Copy command (command C on a Mac; control C on a PC) to copy that text.
- In the Pressbooks window, set your cursor in the body of the chapter.
- Use your computer’s Paste command (command V on a Mac; control V on a PC) to paste text into the chapter body.
- Hit Update to save your changes.
About Pasting Text
Pressbooks will automatically clean up text that you cut and paste from Word.
If you cut and paste in the way described above, you will retain the formatting that will translate correctly into book files –headers and subheaders, paragraph line breaks, bolding, italics and bullets. Everything else (i.e. any span tags or other gremlin code from Word) will disappear.
If you’d prefer to turn this function off and import rich text (not recommended), deselect the “T” button on the menu of the Visual Text Editor.
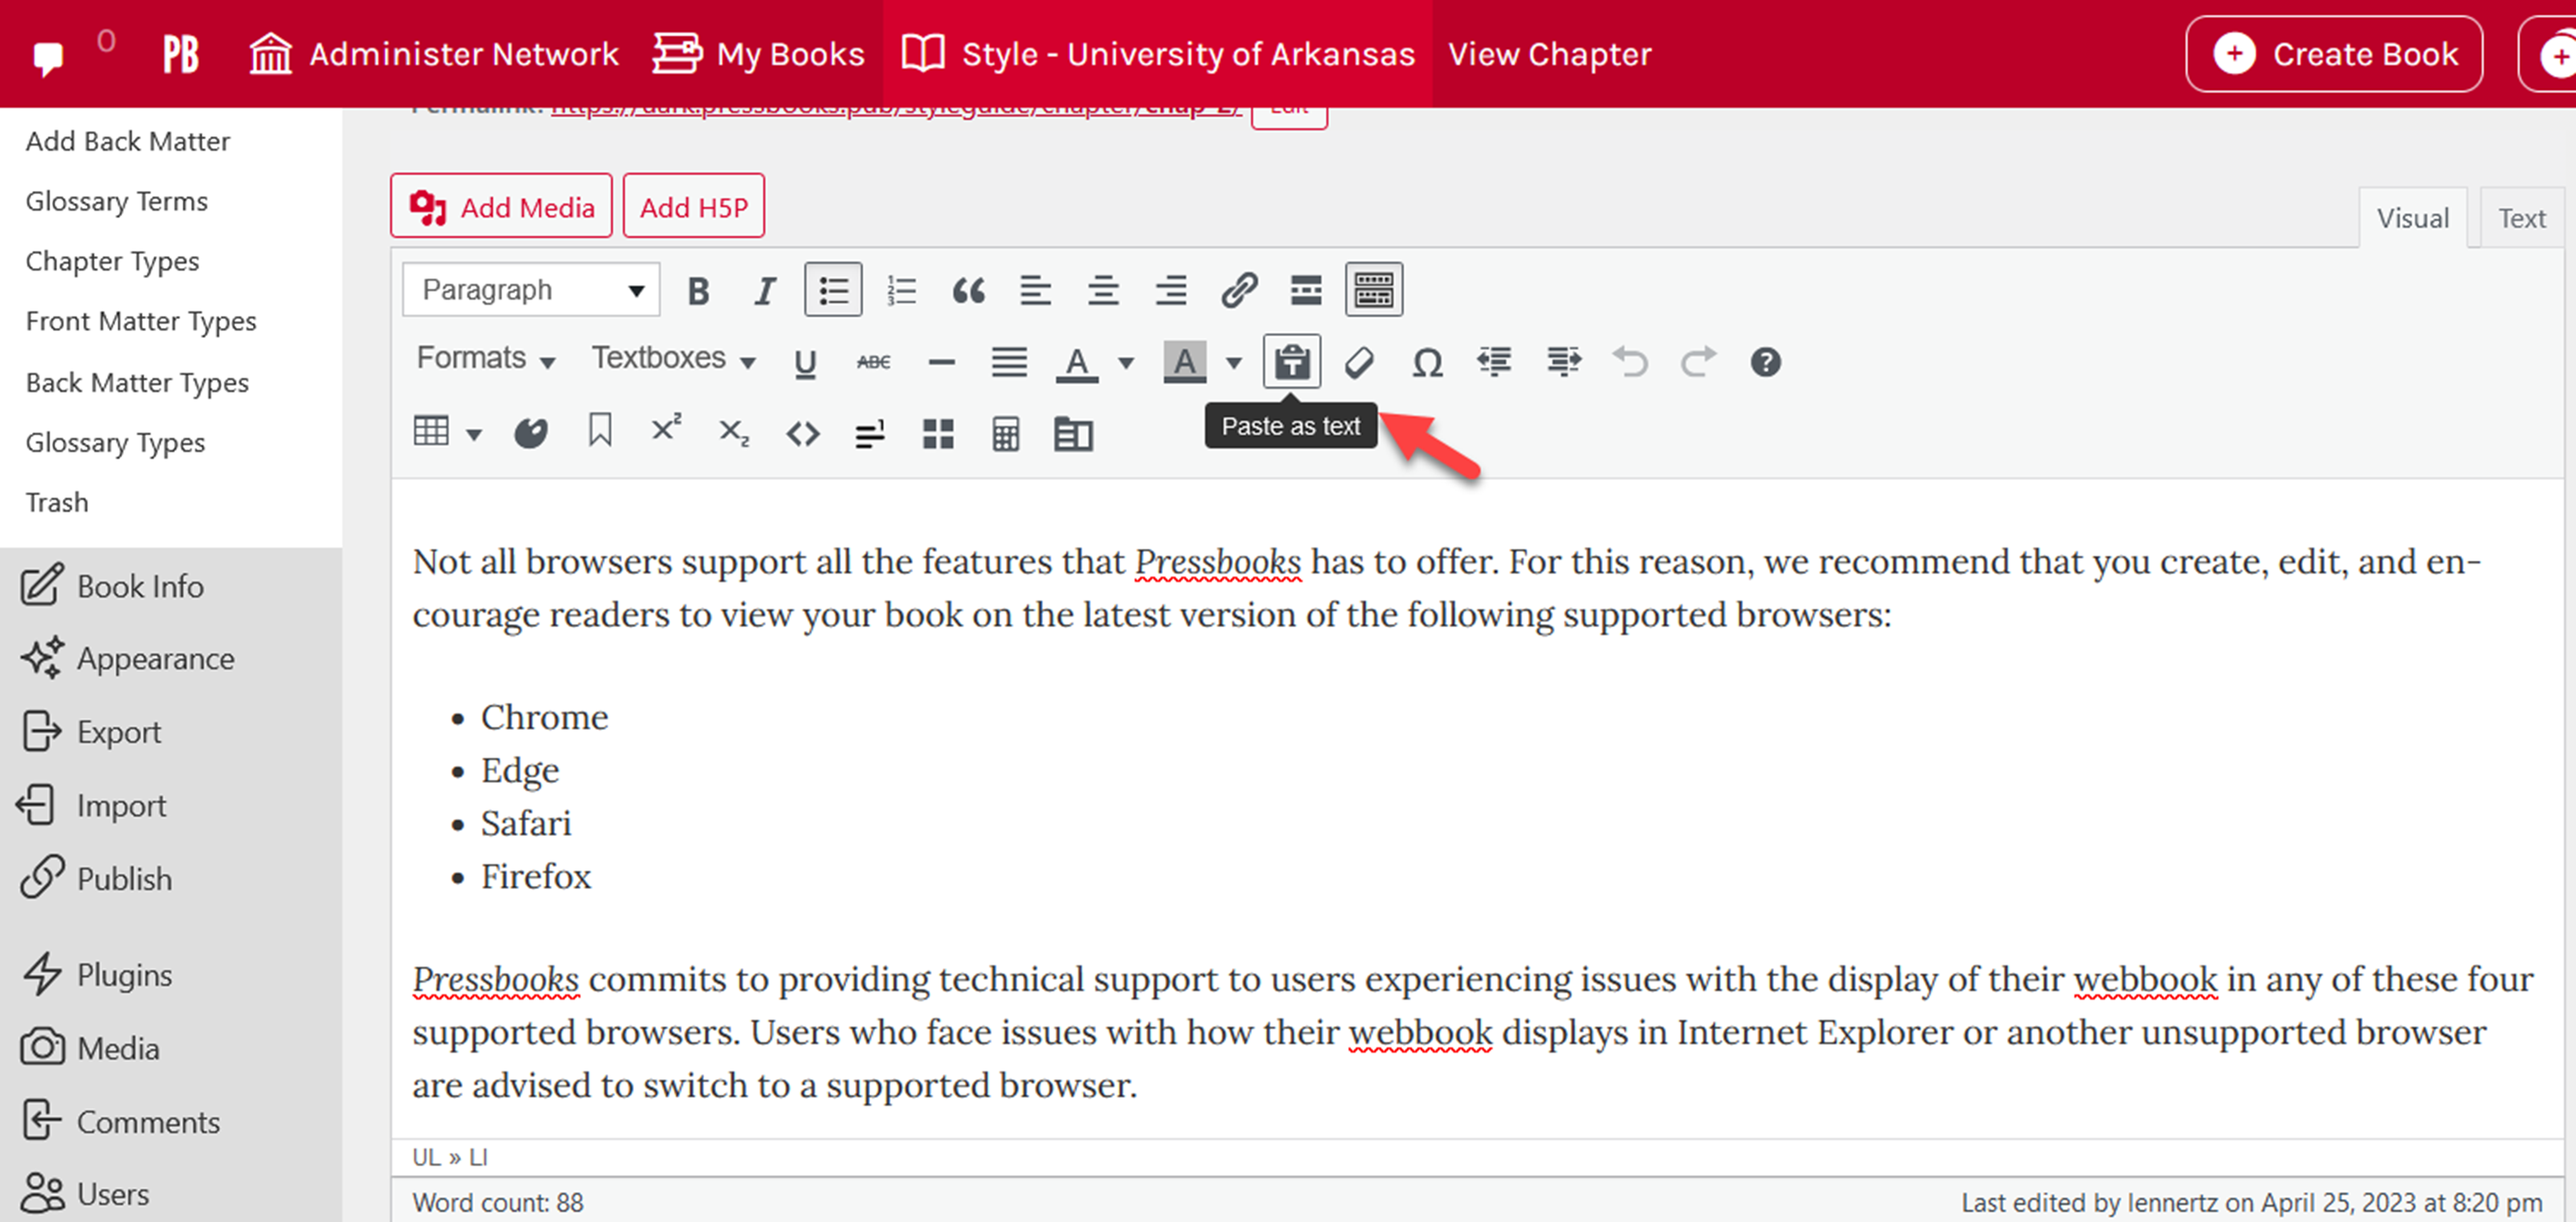
Pasting without retaining underlying codes
Also, if you are pasting from Word or another non-text editor, using the Paste from Text button to import your text. Using Paste from Text will clean up and remove any underlying problematic formatting such as span tags that may interfere with a clean output.
Writing Directly into Pressbooks
Writing your book directly in Pressbooks is arguably one of the easiest ways to assure your book is well-formatted. Plus, it gives you the added benefit of using the platform as a tool to organize your book.
Steps to writing content for your book in Pressbooks
- Log in to Pressbooks.
- At the top left of your dashboard, click on My Catalog and navigate to the book you would like to work in.
- Click on Text and Organize. Pressbooks lets you divide your book into parts and chapters.
- Once you’ve added some parts and chapters, click on the chapter you would like to work in.
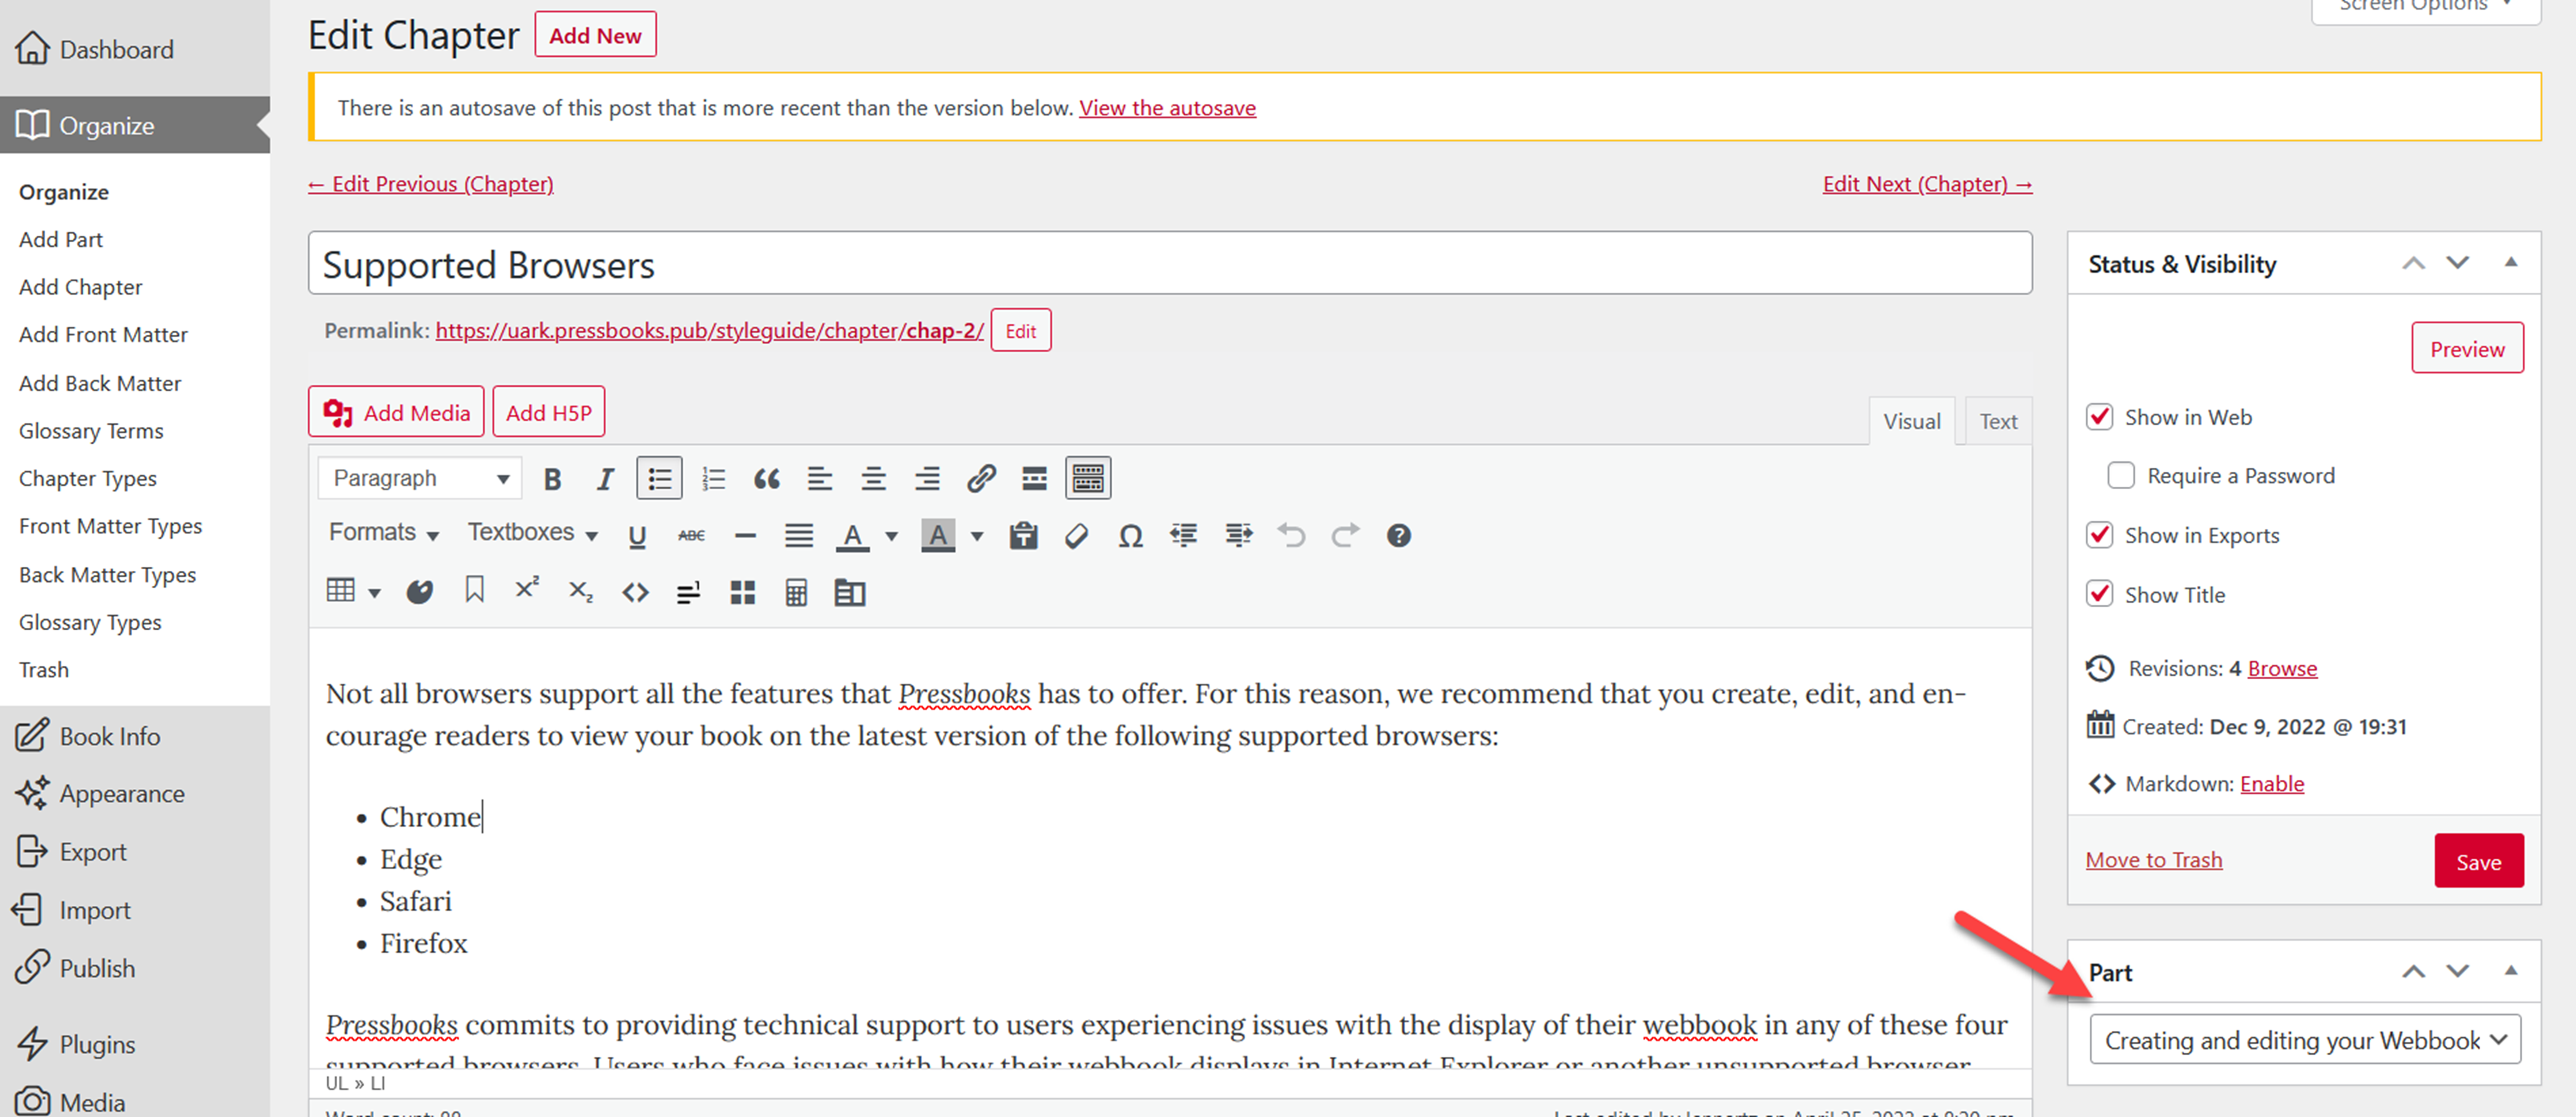
- Add a title.
- Under the top right widget, tell Pressbooks what Part to organize your chapter under. (You can change this anytime.)
- The checkboxes in Export Settings let you include or exclude the chapter from your exports, show or hide the title in your exported files.
- Write your chapter directly in the text box.
- Beneath the main text box, decide whether to allow comments on that chapter or not (NOTE: comments must be enabled globally for this option to appear. )
- If desired, specify an individual author for this specific chapter.
- When ready, either publish your chapter, schedule it to go live at a later time or make it a private draft by using the options under the Publish tab at the right.
- Be sure to click Update to save.
- If necessary, under Publish, you can browse through past versions of your chapter and revert to them.
- Once your chapter is published, see what it will look like to a reader on the Web by clicking on the View Chapter or View Post link (middle top).
Visual vs. Text Editor
There are two ways to write your book in Pressbooks: using the visual editor or the text editor. You can toggle between these editors at any time by clicking on the Visual or Text tabs at the top right of the text box. (Be sure to click update before switching between these two in order to save your changes.)
The visual editor will apply the appropriate HTML and CSS code in the background to create a digital book while you use a visual formatting menu similar to that in word processing applications such as Word.
The text editor enables you to use HTML and CSS to style your book.
It’s also helpful when you want to review the “markup” that may be causing trouble spots in your layout. Learn more about good markup and bad markup.
Writing and Editing Tools & Keeping Your Formatting Clean
Most menu options in Pressbooks’ Visual Editor are self-explanatory and will be familiar to you. A few tips:
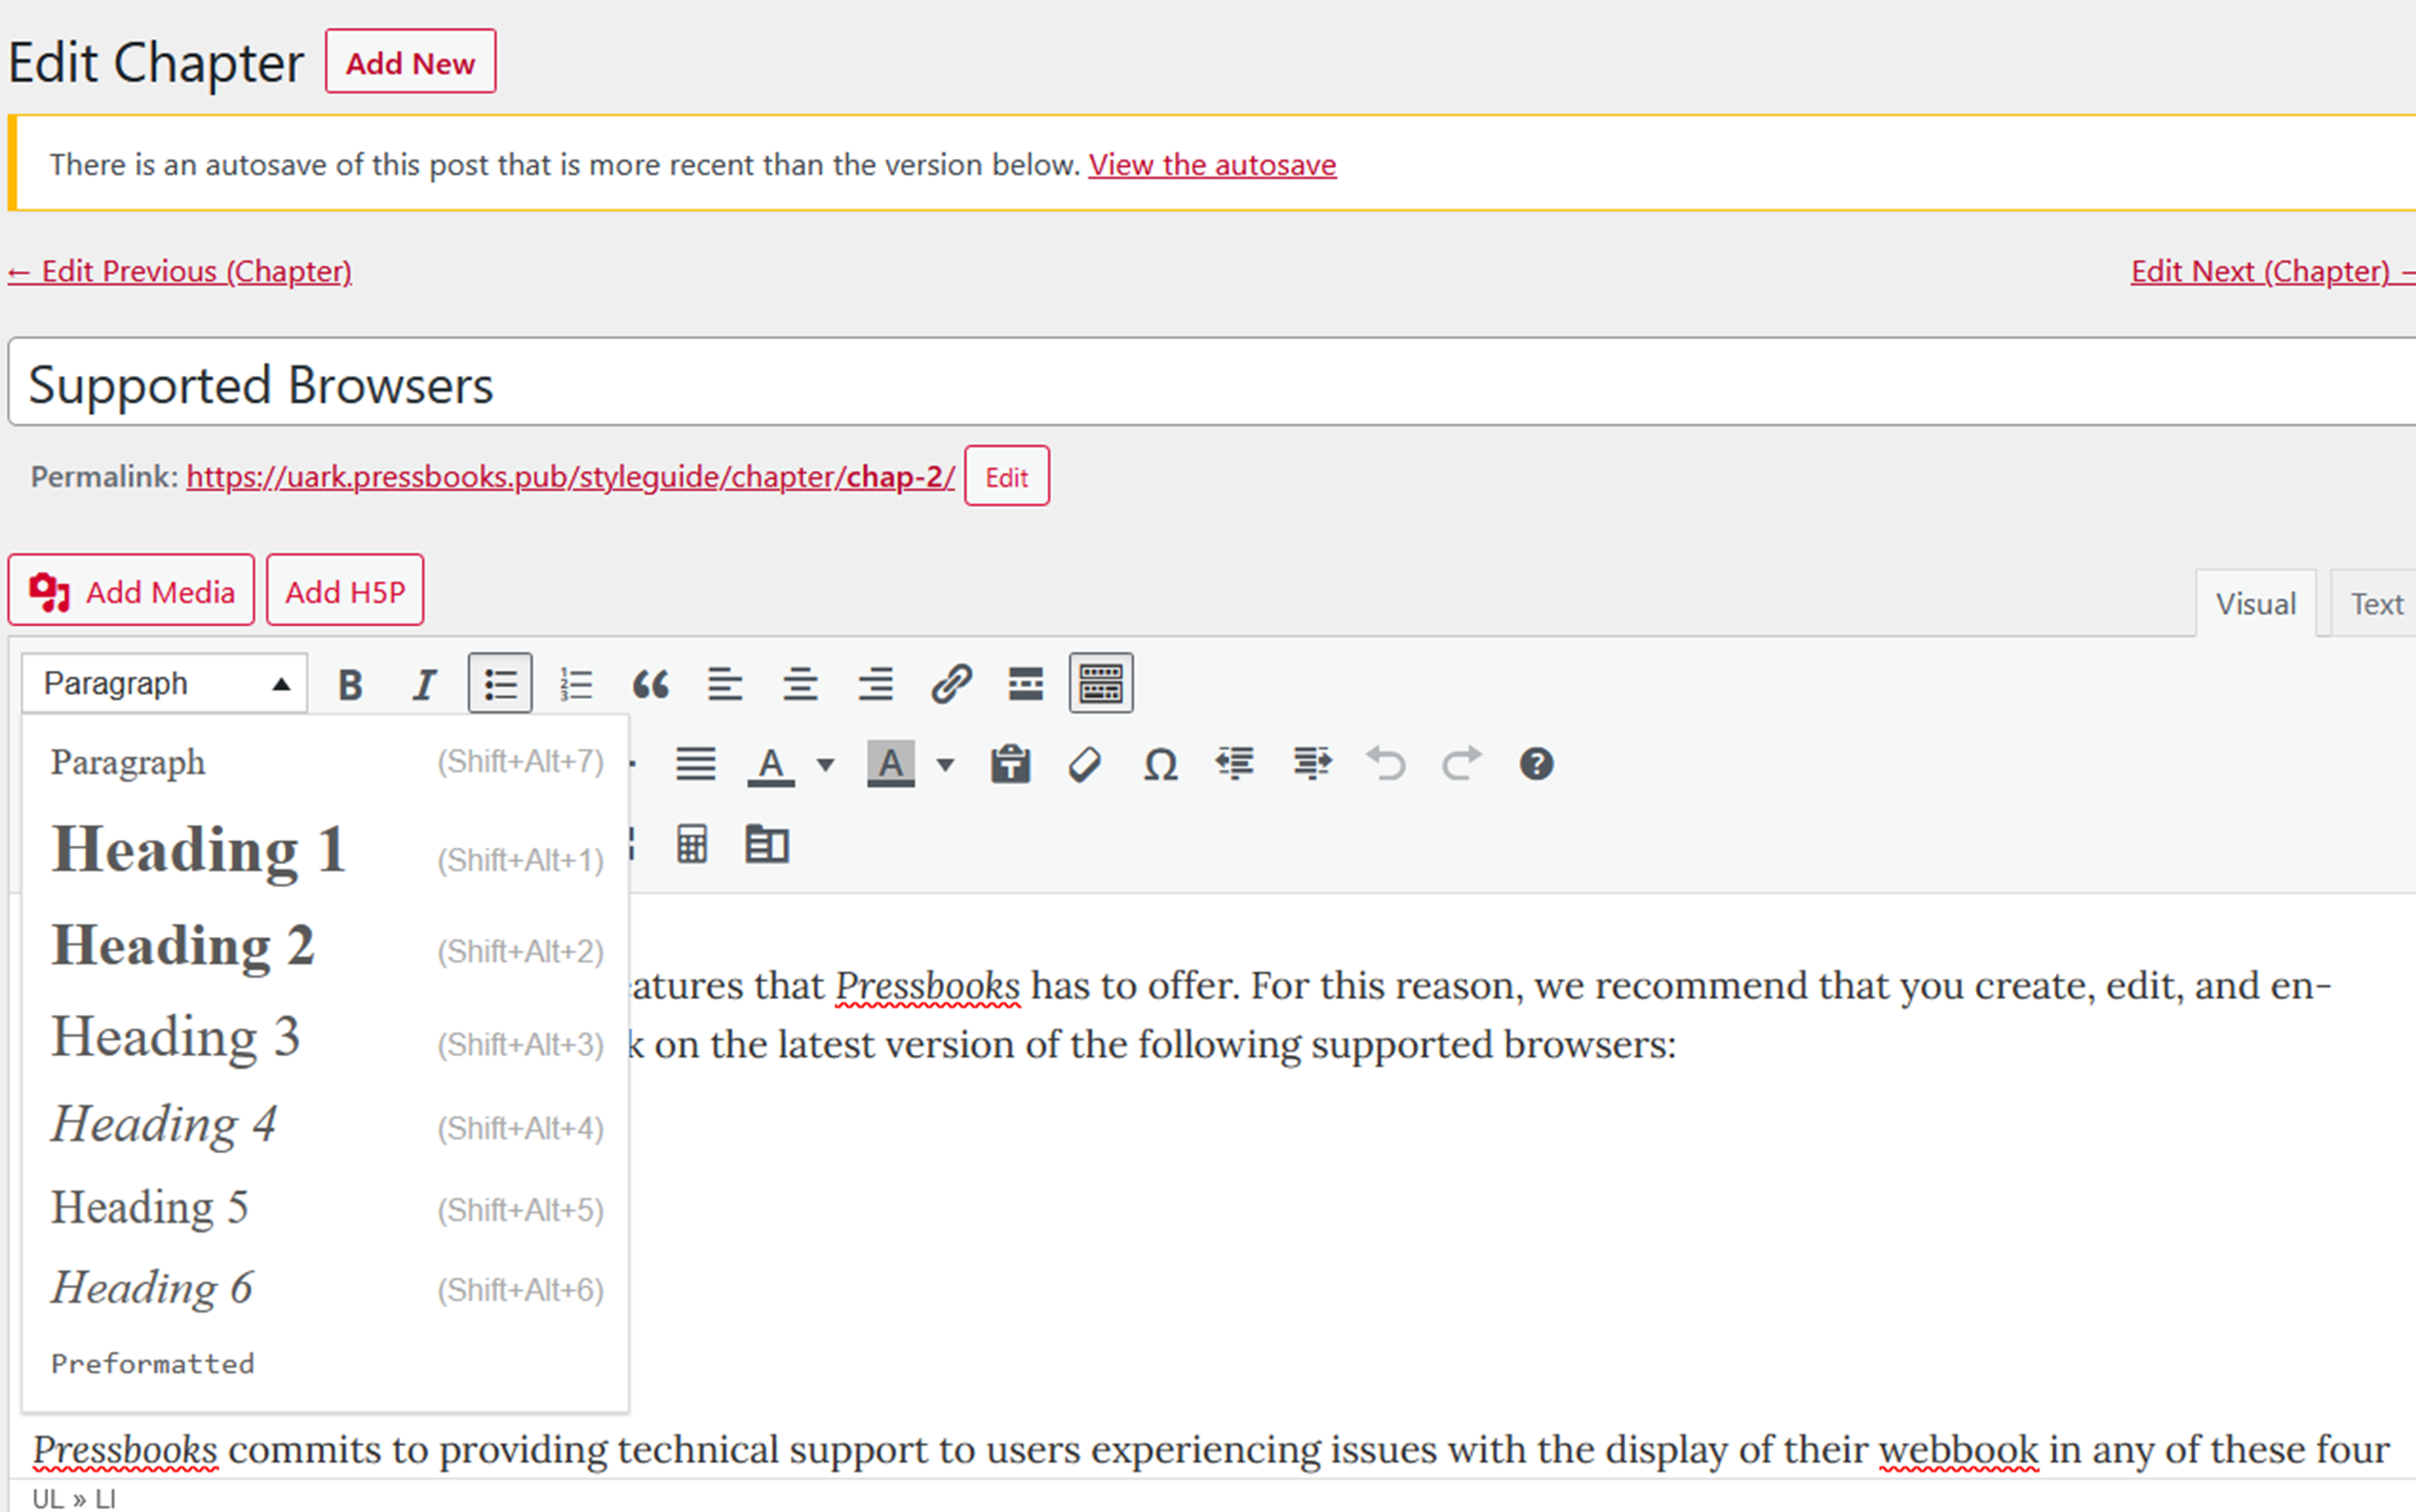
- Do not try to work within the text box of the visual editor to apply fancy formatting (such as bolding or enlarging headings). Instead, use the dropdown menus labeled Paragraphs and Formats to apply styles to your book. This will ensure the best and cleanest output.
- Also, if you are pasting from Word or another non-text editor, using the Paste from Text button to import your text. Using Paste from Text will clean up and remove any underlying problematic formatting such as span tags that may interfere with a clean output.
What to Do Next
Once you’ve imported your book, whether manually by cutting and pasting or instantly through one of the other import methods, make sure all the elements have transmitted correctly.
To do so:
- Go into your Dashboard and click on Organize Text. Check that every chapter and section imported in their original hierarchy and that none are missing.
- Next, go into each chapter. Highlight each type of text–headings, paragraphs and subheadings, and apply a style in the Visual Text Editor’s formatting menu.
- View your book to determine if there were any funky formatting and go back and delete that formatting in the Text Editor
These two steps will ensure that your book outputs elegantly and that there are no formatting inconsistencies.
Cite your source!
Whenever adapting a book, give credit to the original creators.
create a duplicate copy of a book within any Pressbooks site

Feedback/Errata