4 Preparing for Pattern Selection
Sheri Deaton
Preparing for Pattern Selection
What is the best advice for individuals who are picking out a pattern? Read the directions!
When you are selecting a pattern, read the pattern envelope thoroughly before making your purchase. Note the level of difficulty of the pattern, amounts of fabric needed, recommended fabrics, and notions required. If you select a pattern from an electronic source, read the directions carefully. Follow the directions for printing patterns, noting the sizing recommendations for printing and the markings for taping pattern pieces together. Time spent reading the directions and pattern envelope is not time wasted, but rather an investment that will save you time, tears, and money in the long run (Deaton, 2021).
Pattern Envelope
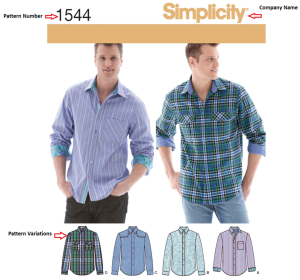
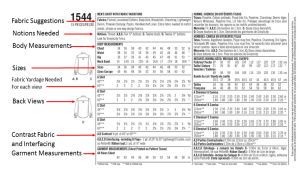
While many patterns can be found, purchased, and downloaded online, you may also enjoy finding patterns at your local craft or home goods store. Commercial patterns are packaged in a pattern envelope. The envelope has specific information for size, fabric recommendations and the amount needed notions, level of difficulty, front and back pictures or sketches, and design variations. On the front of the pattern envelope are the company or designer name, pattern number, front views of the design variations, and sometimes the size range (Apple, 2021). When purchasing a pattern, you must understand the various aspects of the pattern envelope.
See the following pictures as examples of pattern envelopes (Apple, 2021).
A. Front of Envelope
B. Back of Envelope
Watch this video on how to read a pattern envelope.

Finished Garment Measurements
How big will the garment be once it is sewn together? Looking at these numbers can give you an idea of how tight or loose the garment will fit on your body. The finished length of the skirt will help you see where the garment will hit on your legs. Use this information to help you select the size that best fits your body type and size.
TIP: The finished garment measurements are based on your ability to read and follow the directions when sewing. Be sure to note the seam allowance for the garment and follow the suggested seam allowance throughout the entire garment. Otherwise, your finished garment measurements will be skewed, and the garment will not have the intended appearance.

Pattern Classification
How complicated is this pattern? Companies have attempted to help consumers by labeling patterns according to their difficulty. In general, the level of difficulty increases as the number of pattern pieces increases. Also consider if the pattern calls for inserting a collar, zipper, or sleeves.
- Beginner = simple design with basic techniques
- Intermediate = more complex; may include a zipper or a dart
- Advanced = highly detailed design with multiple construction methods
TIP: Consider your skills and how the pattern is classified as you select your pattern. For your first project, consider investing in a pattern designed for a beginner. Use the skills you learned through compelting the project to advance to the next level. Never forget the power of YET–you might not be able to complete this pattern at this moment in time, yet with more experience and confidence, you may find yourself accomplishing these difficult patterns with ease!
Pictures and Sketches
If you are a visual learner, you will probably enjoy looking at the pictures on the envelope to see what the finished product will look like. Look at the front and back views, noting the variations and other items you may not have noticed from the front pictures.
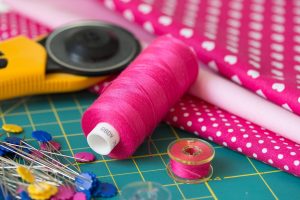
Notions
What is a notion? This is an inclusive word used for all the supplies you would need to complete this project (Westfall, 2013). Items could include but are not limited to thread, elastic, buttons, interfacing, zippers, bias tape, and trims.
TIP: When you buy your pattern, go ahead, and get your fabric and notions at the same time. Use the fabric color to help you pick out thread color and other notion colors. It can be overwhelming to pick out thread after you have gotten the fabric, as there are so many shades of each color!
Suggested Fabrics
Please read the suggested fabrics! These are here for your assistance, to ensure your success as you construct your item. Use this information as you make fabric choices. Feel the bolts of fabric in the store, noticing their weight, design, and hand (the way they feel and drape). Consider how this would feel on your body if you were choosing fabric for a piece of apparel. If your pattern calls for knit fabrics, be sure to identify the correct gauge of knit as you purchase the fabric.
TIP: For beginners, I highly suggest you avoid knits. They stretch and pull as you sew and learning how to navigate the fabric can be a little overwhelming in the beginning. As you gain skills and confidence, try out some patterns involving knit fabrics!
Yardage Requirements
A chart is on the back of each pattern envelope to help you see how much fabric you would need to purchase to make the garment. Find the garment view you wish to make, then identify the row labeled with the width of the fabric you are purchasing. Follow the row across to the column labeled with your size. This is how many yards of fabric you need to buy (Westfall, 2013).
TIP: When you are in the store, take a picture of the end of the bolt of fabric. Note the fabric content and the recommended ways to launder the fabric. Don’t forget to pre-wash your fabrics before you begin cutting and sewing if this is part of the preparation required for your project.
Taking Body Measurements
If you are preparing to create a piece of apparel, the first thing you need to do is to choose a pattern to fit your body size. Do not depend on the manufacturer’s sizing–be sure to take your body measurements to ensure that you have the size of pattern that is going to best fit your body shape. When taking measurements for your body it is best to use a soft cloth or flexible tape measure. Some measurements may require the help of a friend to be completed with accuracy. When measuring yourself, make sure the tape is straight, not twisted, and in line with the appropriate body part. When determining the circumference of the body for the chest, hips, and waistline measurements, it is important that the tape is parallel to the floor. The most accurate readings will be taken with tight fitting clothing or in the type of undergarments one would typically wear.
Watch this video on how to use a tape measure.
How to Use a Tape Measure Video
How to Take Measurements for Men and Women
- Height: Stand against a wall without shoes on. Have another person make a mark level with the top of your head. Measure from this point down to the floor. Note: If you are trying on a dress or skirt and need the hem to be adjusted, it is best to wear the shoes you intend to wear with this garment when taking this measurement.
- Bust/Chest: Put the tape measure around the back and over the fullest part of the bust or chest. Ensure that the tape is not twisted. For most men, this is at the armpits, yet for most women this will be at the nipple line. This is the full bust measurement.
- Waist: Put the measuring tape around the smallest part of the waistline. Allow it to settle into the natural waistline position, approximately landing close to the belly button. Ensure that the tape is not twisted in the back.
- Shoulders: Measure the distance between one shoulder bone to the other across the top of the back. The measuring tape will be parallel with the floor.
- Hip/Seat: Put the measuring tape over the fullest part of the hips, ensuring that the tape is in a straight line as it wraps around the body. For most females, the fullest part of their hips will be about 7-9″ below the waistline. For most men measure 7 1/2 ” below the waistline for this measurement.
- Inseam: This is done best by finding a pair of pants or slacks that fit you well and are the preferred length. Lay them on a flat surface and measure the distance from the crotch seam to the bottom of the leg along the inner leg seam.
- Outseam: This is done best by finding a pair of pants or slacks that fit you well and are the preferred length. Button the pants, and lay them on a flat surface. Measure the distance from the waistband to the bottom of the leg along the outer leg seam.
How to Take Women’s Measurements
In addition to the measurements listed above, many patterns will ask for the following measurements for women.
- Back waist length: With the head bent over, locate the prominent bone at the base of the neck. Have a friend assist you as you measure from this bone down the center of the back to the waistline. Ensure the measuring tape is straight and lands in the natural waistline.
- Font waist length: Place the top of the measuring tape on the collar bone and measure the distance down the front of the shirt to the waistline. This will go over the fullest part of the chest.
- Sleeve: Bend the arm and place it on the hop. Measure from the top of the shoulder over the bent elbow to the wrist.
Check out these step-by-step directions and videos on how to take a woman’s measurements.
TIP: Take your measurements while wearing undergarments or tightly fitting clothing. If you have a bestie, elicit their help if you are struggling with taking some of these measurements. Be sure that the tape does not twist and turn as you measure. Also–never forget that your value does not come from a number on a scale or a measuring tape. Each person has a unique shape and personality. Embrace your shape and amazing attributes!

How to Take Men’s Measurements
In addition to the measurements listed above, many patterns will ask for the following measurements for men.
- Neck: Measure around the base of the neck. Add 1/2″ to this measurement for comfort. This will be the neck size indicated on dress shirts.
- Sleeve: Bend the arm up. Measure from the base of the neck across the center back to the elbow, across the elbow crook, and over the wrist bone. This will be the sleeve length indicate on dress shirts and jackets.
Check out these step-by-step directions and videos on how to take a man’s measurements.

TIP: Take your measurements while wearing undergarments or tightly fitting clothing. If you have a bestie, elicit their help if you are struggling with taking some of these measurements. Be sure that the tape does not twist and turn as you measure. As you take the neck measurements, make sure you will be able to breathe with the top button secured. Comfort in clothing is critical!
I’ve taken measurements… Now what?
Once you know your digits, compare your measurements to those listed on the pattern envelope. Sizes may appear as numbers (6, 8, 10, etc.) or as letters (A, B, C, etc.) Follow the pattern’s guidelines for selecting a pattern size. Also, consider this advice:
- Consider your preferred fit. If your measurements fall between two sizes, select the larger size for a looser fit (Westfall, 2013).
- When making apparel designed for the upper body (jackets, shirts, dresses, coats) look at the largest measurement, which is usually the bust or chest measurement (Westfall, 2013).
- When making apparel for the lower body (slacks, skirts, shorts) women are advised to select their pattern based on their largest measurement (usually the hip) and men should select their size based on their largest measurement (usually the waist) (Westfall, 2013).
Hemming it Up
As you prepare to select your pattern, take the time to become familiar with the components included in a pattern envelope. Read and follow the directions! Follow the manufacturer’s guidelines for fabric selection and purchase your notions at the same time to ensure the colors match or complement one another.
As you take your measurements, remember that these numbers are used to help you identify a pattern size that would fit your body type, but they should not be used to measure your worth or self-esteem.
Resources
| Resources | QR Codes |
| How to Read a Sewing Pattern |  |
References
Apple, L. (2022). Introduction to Apparel Production Workbook. Uark.pressbooks.pub. Retrieved 20 September 2022, from https://uark.pressbooks.pub/introapparelproductionworkbook/.
Deaton, S. (2021). Teaching Apparel Production. Presentation.
Westfall, M. (2013). Successful sewing. The Goodheart-Willcox Company, Inc.
