10 Cutting Patterns and Fabric
Sheri Deaton
Cutting Patterns and Fabric
Cutting the Pattern
The following suggestions are based on experiences in the apparel production laboratory (Deaton, 2021). Before cutting out pattern pieces, locate the views on the pattern envelope to select the view of the product you are making. Using the pattern envelope and the instruction sheet, note which pattern pieces are included in this view.
- Do not cut out all the pattern pieces. Only cut out what you need for this project. Save the rest for another project. Put extra pattern pieces in the pattern envelope to reduce confusion during the production process.
- If pattern pieces are excessively wrinkled, use a cool iron and cheesecloth to smooth out the wrinkles in the pattern before cutting the pieces out. A smooth pattern is easier for novice seamstresses to cut.
- Note the notches–cut them OUT instead of IN. Cutting around the notches will create a visual guide for the eyes when trying to locate the front and back of garments and will increase ease when pinning and sewing during production. Cutting into the pattern and the fabric will weaken the fabric and could create a hole in the seam if the snip is too deep.
- For apparel products, select the correct size based on the measurements previously taken. Note the size you are cutting out and cut out the pattern pieces on the same size for each piece involved in the product you are creating. Example: Cut on the size 10 line for all pattern pieces needed for the garment; not size 10 for some and size 8 for others.
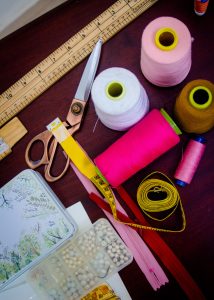
- Prepare before cutting the pattern. Allow enough space and time to cut out the pattern without being rushed or cramped. Use a cutting board, sheers, a rotary cutter, and a straight ruler to assist with cutting out the pattern pieces.
Once you have successfully cut out your pattern pieces, store them in a secure place. Seek to visualize how these pieces will go together to create the final product. Visualize yourself successfully cutting out the fabric and creating the product of your choosing.
Fabric Preparation
Before placing one pin in the fabric, be sure you have prepared the fabric accordingly. As a reminder, once you have read the pattern envelope and purchased the suggested fabric for the project you are wanting to create, it is time to prepare the fabric. What you do to the fabric will vary depending on the fabric itself.
- If the fabric is off-grain, it may need to be straightened.
- If the fabric is not already preshrunk, it needs to be! Failing to do this will cause your garment to not fit properly after it has been created and washed and dried for the first time.
You may have the straightest patterns cut out, and you may pin them perfectly to the fabric. However, if the fabric is not preshrunk or is not straight of grain, the finished product will suffer.

When all else fails… Read the directions
Following directions on the pattern instruction sheet is critical. The pattern instruction sheet will show a pattern layout illustrating how to fold the fabric and how to lay the patterns out on the folded fabric. Follow these suggestions to reduce fabric waste and increase efficiency.
Use the key on the pattern instruction sheet to ensure you are putting the pattern and fabric the way it should be pattern printed side up or pattern printed side down; fabric printed side up or fabric printed side down. Read and follow the directions!
TIP: Before students begin to fold their fabrics, have them highlight the key on the pattern instruction sheet, ensuring they see this key and understand what this means.

Folding Frenzy
There are multiple strategies for folding fabric, but the following are the most common ways to fold the fabric and prepare to pin the pattern pieces.
- Lengthwise fold: This is when the fabric is folded in half lengthwise, with the selvages matching (Westfall, 2013).
- Crosswise fold: Fabric is folded so that the cut ends match and is commonly used when pattern pieces are too wide to fit on the fabric if it was folded lengthwise (Westfall, 2013).
- Double fold: If the pattern instructions call for a double fold, make sure the full length of the folded side is the same width (Westfall, 2013). Measure twice! If you do this correctly, the folded edges will be straight with the grain.
TIP: Fabric that is preshrunk, on grain, and pressed is a fabric that is easier to work with. Consider having your students press their fabric before pinning pattern pieces, to ensure that the fabric is not bunched up or wrinkled in any way (Deaton, 2021). Wrinkled fabric contributes to uneven cuts, which results in uneven fabric pieces, uneven seam allowances, and an inferior product.

Piecing it Together
Once the pattern pieces are correctly cut out, and the fabric has been properly prepared and folded, it is time to begin pinning the patterns onto the fabric. Follow the instruction sheet and guidelines for laying out your pattern pieces (Westfall, 2013).
The following suggestions evolved from research-based practices and personal experiences in the apparel production laboratory setting (Deaton, 2021). For further assistance and greater details on each step, check out the resources at the end of the chapter.
- Ensure that you have enough space and a flat surface on which to work. Do not try to pin the pattern pieces when you are rushed or cramped for space. Take your time and do it correctly the first time.
- Lay out all pattern pieces on the fabric before placing one pin. Make sure all pattern pieces will fit on the fabric you have purchased.
- Follow the instruction sheet for the placement of pattern pieces, allowing enough room between each pattern piece to comfortably cut.
- Follow the symbols on the pattern pieces. If the pattern is to be placed on the fold, ensure that it is on the fold. If it is to be straight of grain, ensure that both ends of the arrow are equal in distance from the selvage.
- Try not to place pattern pieces on the selvage. Because of how they are made, selvages do not have much give; therefore, they could cause an unseemly pucker in the product.
- Once you are sure the patterns are in the correct placement, begin pinning. Each person has a different number of pins they feel comfortable pinning with. Practice will help you perfect your pinning process. Ensure that pins are inside the cutting line and are placed diagonally on the corners. Ensure you are pinning both sides of the fabric if the fabric is on the fold.
- For some fabrics, it is best to use pattern weights instead of pins. Consider what works best for you and for the fabrics you are using.
- Measure twice, cut once! Breathe in and out steadily as you practice safe and efficient cuts with sharp shears.

Self-Check
Use the following drag-and-drop assessment to measure your understanding of pattern symbols now that you have read the text.
TIP: Consider playing classical music in the background or music that will calm yet motivate your students to spend their time productively. As a management strategy, keep the music at a level that is appropriate for students to hear with only a minimal amount of chatter and sewing noises. If students are engaging in conversations and cannot hear the music, do not turn it up, but rather encourage them to stop talking and begin working. Music in the classroom can not only ease tensions and increase productivity, but it can also be an effective tool for noise control and classroom management.
Hemming it Up
The process of cutting out a pattern and fabric for the first time can be overwhelming. As an instructor, you must provide a safe and comfortable space where students can complete these tasks. Seek opportunities to reinforce good techniques, redirect students who are off task or not following procedures, and encourage students through this process.
The first pattern pieces students cut out can be quite intimidating, so I like to use a sample pattern for students to practice cutting out before cutting on their real pattern pieces. Opportunities to practice and refine skills will increase students’ confidence. Provide many opportunities to practice these skills and watch your students grow in their abilities.
Resources
| Resources | QR Codes |
| Cutting Slippery Fabrics |  |
| Details on how to cut out a commercial sewing pattern |  |
| How to layout and cut out a pattern |  |
| Strategies for cutting for right and left-handers |  |
References
Deaton, S. (2021). Teaching Apparel Production. Presentation.
Westfall, M. (2013). Successful sewing. The Goodheart-Willcox Company, Inc.
