Tools for Supporting Creative Design Solutioning
The following text is from the Delft Design Guide.
Daalhuizen, Jaap. 2018. Delft Design Approach, Delft University of Technology.
Mind Map
A Mind Map is a graphical representation of ideas and aspects around a central theme, showing how these aspects are related to each other. With a Mind Map you can map all the relevant aspects and ideas around a theme, bringing structure, overview and clarity to a problem. A Mind Map helps in systematically unpacking abstract thoughts and notions. It is like a tree, with branches leading to the thoughts and aspect of the theme. Graphically, one can use the analogy of the tree by making branches that are important thicker than others. Mind Mapping is an excellent technique for developing your intuitive capacity. It is especially useful for identifying all the issues and subissues related to a problem. Mind Maps can also be used for generating solutions to a problem and mapping their advantages and disadvantages. The latter is accomplished by making the main branches the solutions and the subbranches from each of these the pros and the cons. Analyzing the Mind Map helps you find priorities and courses of action.
When Can You Use a Mind Map?
A Mind Map can be used in different stages of the design process but is often used in the beginning of idea generation. Setting up a Mind Map helps you to structure thoughts and ideas about the problem and connect these to each other. However, a Mind Map can also be used in the problem analysis phase of a design project. Mind Maps also work well for outlining presentations and reports. In fact, Mind Mapping can be used in a wide variety of situations.
How to Use a Mind Map?
Starting Point
The starting point of a Mind Map is a central theme, for example a problem or an idea.
Expected Outcome
The outcome of a Mind Map is a structured overview of ideas and thoughts around a concept or a problem, represented graphically.
Possible Procedure
- Write the name or description of the theme in the center of a piece of paper and draw a circle around it.
- Brainstorm each major facet of that theme, placing your thoughts on lines drawn outward from the central thought like roads leaving a city.
- Add branches to the lines as necessary.
- Use additional visual techniques – for example, different colors for major lines of thought, circles around words or thoughts that appear more than once, connecting lines between similar thoughts.
- Study the Mind Map to see what relationships exist and what solutions are suggested.
- Reshape or restructure the Mind Map if necessary.
Tips and Concerns
- You can find software for Mind Mapping on the Internet. The disadvantages of using computer software are that there is some limitation in freedom of using hand drawings and colors, it is less personal, and it might be less suitable when sharing it with others (you and your computer alone).
- Make digital pictures of your handmade Mind Maps
The Brainstorming Method
What Is the Brainstorming Method?
When people hear the word brainstorming they often think of people sitting together and thinking up ideas wildly and at random. This is partly true! Brainstorming as a method prescribes a specific approach with rules and procedures for generating ideas. It is one of many methods used in creative thinking to come up with lots of ideas to solve a problem. Various methods or approaches to creativity exist, such as: brainstorming, synectics, lateral thinking/random stimulus and biomimetics. Brainstorming was invented by Osborn as early as the 1930s. Apart from producing large numbers of ideas, brainstorming is based on another very important principle: the avoidance of premature criticism. Of course ideas must be assessed critically, but an all too critical attitude often holds back the process of generating ideas. We follow the brainstorm method of Osborn (1953) and Parnes (1992). This method consists roughly of the following steps:
- Diverging from the problem. Beginning with a problem statement, this first stage is about a “creative démarche”: a creative path where lots of ideas are generated using different techniques. Wild and unexpected ideas are welcomed.
- Inventorying, evaluating and grouping ideas. The second step is about evaluating, reviewing and grouping ideas. Now an overview is created of the solution space (e.g. all possible solutions) and whether more ideas are needed.
- Converging: choosing a solution. The third step is about choosing ideas and selecting ideas for the next phase in the design process.
The process underlying this method is built upon the following assumptions:
- Criticism is postponed. The participants in a brainstorming session should try not to think of utility, importance, feasibility and the like, and certainly not make any critical remarks thereon. This rule should not only lead to many, but also to unexpected associations. Also, it is important to avoid participants feeling attacked.
- ‘Freewheeling’ is welcomed. The purpose is to have participants express any idea they think of; ‘the wilder the idea, the better’, it is said. In a brainstorming session an atmosphere must be created which gives the participants a feeling of safety and security.
- Combination and improvement of ideas are sought You should endeavour to achieve better ideas by adding to, and building upon, the ideas of others.
- Quantity is wanted. Try to think of as many associations as possible. The objective of this rule is to attain a high rate of association. The underlying idea is not only that ‘quantity breeds quality’ but also that through a rapid succession of associations the participants have little chance of being critical.
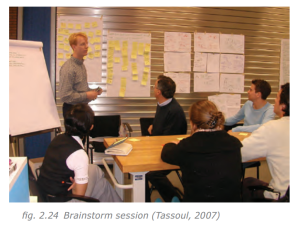
Brainstorm Session
Brainstorming (see figure 2.24) is done with a group consisting of 4-8 people. A facilitator leads the brainstorm session and asks the group provocative questions. The group’s responses (the ideas) are written down on a flip-chart. The stages that the group goes through in a brainstorm session are methods on their own, and different alternative methods are possible within a brainstorm session (for example: how to’s, who-what-where-when-why-how, forward and backward planning, and wishful thinking).
Brainwriting Session
Brainwriting is done with a group consisting of 4-8 people. A facilitator leads the Brainwriting session and asks the group provocative questions. Each participant writes down his/ her idea on a piece of paper, and the papers are passed on to each other. In this way, an idea is elaborated when it passes through numerous participants, or an idea could serve as an inspiration for new ideas. Different versions of this method are possible. A well-known method is the 6-5-3 method.
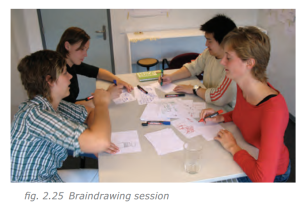
Braindrawing Session
In a Braindrawing session (see figure 2.25) ideas are not written down but are drawn or sketched. This distinguishes Braindrawing from brainstorming, which only uses words. In a Braindrawing session each participant draws his/her ideas on paper. Also, it is possible to build on each other’s ideas by passing through the drawings similar to a Brainwriting session.
When Can You Use the Brainstorming Method?
A brainstorm is usually carried out in the beginning of the idea generation, with the goal of producing a large number of ideas with a group of participants.
How to Use the Brainstorming Method?
Starting Point
The starting point of a brainstorm session is a problem statement (one single concrete target).
Expected Outcome
The outcome of a brainstorm session is a large number of ideas.
Possible Procedure
- Develop a statement of the problem (e.g. with H2’s, one single concrete target) and select a group of 4-8 participants. Draw up a plan for the brainstorm session, including a detailed timeline, the steps written down, and the methods used in the brainstorm session (example of a session plan
- You could send a note containing the statement of the problem, background information, examples of solutions and the four brainstorming rules, to the participants some time before the session.
- Have a preparatory meeting together with the participants, right before the actual brainstorm session, whereby the method and rules are explained, the problem, if necessary, is redefined, and a so-called warm-up is held. A warm-up is a short stimulating brainstorming exercise unrelated to the problem.
- At the beginning of the actual brainstorm session, write the statement of the problem on a blackboard or flip chart clearly visible to everyone, as well as the four rules.
- The facilitator should ask provocative questions to the group and write down the responses on a flip chart.
- Once a large number of ideas has been generated, the group should make a selection of the most promising and interesting ideas. Usually, some criteria are used in the selection process, which should be established with the group.
Tips and Concerns
- Brainstorming is suited for solving relatively simple problems with an ‘open’ formulation. For more complex problems, it would be possible to brainstorm about subproblems, but then the overall view might be lost. Furthermore, brainstorming is not suited very well for problems whose solution requires highly specialized knowledge.
References and Further Reading
Roozenburg, N.F.M. and Eekels, J. (1995) Product Design: Fundamentals and Methods, Utrecht: Lemma.
Roozenburg, N. and Eekels, J. (1998, 2nd ed.) Product Ontwerpen: Structuur en Methoden, Utrecht: Lemma.
Tassoul, M. (2006) Creative Facilitation: a Delft Approach, Delft: VSSD.
Higgins, J.M. (1994) 101 Problem Solving Techniques, New York: New Management Publishing Company
