Develop Prototypes to Further Define Concepts
The following is an excerpt from the Delft Design Guide.
Daalhuizen, Jaap. 2018. Delft Design Approach, Delft University of Technology.
Design Drawing
When you enter a design studio you will find out that drawing by hand is an integral part of the decision making process, used in the early stages of design, in brainstorm sessions, in the phase of researching and exploring concepts, and in presentation. Drawing has proved to be a versatile and powerful tool for exploring and for communicating. (see: Sketching, Eissen 2007).
Exploring
Explorative drawing enables the designer to analyze visually and to generate and evaluate ideas throughout the entire product design cycle, and especially in the synthesis phase (see section 1.3 – The Basic Design cycle in the linked PDF above). That also includes:
- Analyzing and exploring the perimeters of the problem definition
- Using drawings as a starting point for new ideas, by means of association
- Exploring shapes and their meaning, function and aesthetics
- Analyzing and structuring principle solutions and visualizing structural and formal concepts (see section 1.5 – The Fish Trap Model in the linked PDF above).
Hand drawing is also beneficial to the development of the designer’s visual perception, his or her imaginative capacities and perceptiveness of form in general.
Communicating
Next to verbal explanation, a designer also uses drawing to interact and communicate with several groups of people, with different levels of understanding of professional jargon:
- Fellow-designers or team members
- Model makers
- Marketing managers
- Clients and contractors
- Public offices.
Effective Drawings
The significance of a drawing depends on the context in which it is made. A drawing serves its purpose when it is efficient. Therefore a certain phase in the design process may require a certain type of drawing. Time is an issue and in many cases, a quick, suggestive sketch is preferable to a more time consuming rendering.
For generating and evaluating ideas, hand drawing is more versatile than CAD rendering and prototyping. A rendering can look very definite and unchangeable, which is not appropriate, for example, when a studio is still conferring with its client about design directions and possibilities. A (brainstorm) sketch can also easily be upgraded into a more presentable drawing, on paper or digitally by using a tablet and e.g. Adobe Photoshop or Corel Painter.
Early Phase
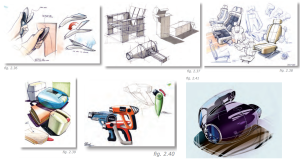
In the early phase of the design process, drawing tends to be simple: basic shapes or configurations, (grey) shading and casting shadows (figure 2.37). This kind of drawing incorporates the basic skills and rules of perspective, construction of 3D shapes, shading and constructing cast shadows (figure 2.38). Color is not always used and very often this kind of drawing will suffice for idea sketching or structural concepts (fig. 2.38, and see section 1.6 – The Fish Trap Model).
Preliminary Concept Sketching
When several ideas are combined to develop preliminary concepts, the designer has a general idea about the materials being used, the shape, its function and how it is manufactured. Colour and expression of the materials (e.g. matt or reflective plastic) become more important and drawings become more elaborate. (figure 2.39) Side-view sketching can be a quick and easier way of making variations in shape, colour, details, etc. (figure 2.40).
Mixed Media
With a PC and tablet the designer can easily adjust colour and shading in the (scanned) drawing and add textures or the brand name. Computer sketching also has some advantages. It can speed up the drawing and enhance the designer’s eye-hand coordination and muscular movement. A relatively new explorative medium in generating ideas is called Intuitive Sketching (van den Herik and Eissen, 2005). This method uses a simple doodle as a starting point (figure 2.41), as a means to break free from conditioning, to express feeling without hindrance, and to expand your visual language.
By combining or integrating several drawings with other types of images (figure 2.42a and b), layers of information can be presented in a coherent way and a suitable context can be provided: the meaning of the product, user environment, etc.
Material Concept Sketching or Preliminary Design
When concepts become definitive, when you want to explore or explain how different manufactured parts are assembled, or when you are communicating with an engineer, choosing an exploded view is effective (figure 2.43). Side-view drawings for exact dimensions, detail drawings, ‘ghost’ view or shaded cross-sections can also be very useful in communication. Drawings of user interaction can serve to get feedback from users, prior to the testing of prototypes (figure 2.44).
References and Further Reading
Eissen, J.J., van Kuijk, E. and de Wolf, P. (1984) Produkt Presentatietechnieken, Delft: DUP.
Eissen, J.J. and Steur, R. (2007) Sketching: Drawing Techniques for Product Designers, BIS Publishers.
van den Herik, Y. and Eissen J.J. (2005) Intuitive sketching: a new and explorative medium in generating ideas, CAID&CD’ Delft 2005: applications of digital techniques in industrial design engineering. pp. 708-713. Beijing: International Academic Publishers
http://www.sketching.nl/ (retrieved May 2009). see also www.designdrawing.io.tudelft.nl
Three-dimensional Models
What Are Three-dimensional Models?
A three-dimensional model is a physical manifestation of a product idea. It is a hand-built physical model that represents a mass-manufactured product. In the design process, three-dimensional models are used to express, visualise and materialise product ideas and concepts. Three-dimensional models are also called prototypes: the word prototype comes from the Latin words proto, meaning original, and typus, meaning form or model. Thus, a prototype is an original form, a first-of-its-kind model.
Prototypes offer more than drawings. Prototypes are tangible, three-dimensional forms; they can be picked up, turned over and looked at from different points of view as opposed to drawings. With prototypes, tests and measurements can be carried out to verify whether a particular solution or solution principle works. And prototypes are effective tools to communicate product ideas and concepts. Building prototypes is a form of visualising the final product form. It is a technique just like sketching, making final drawings, photography or filming. In that sense, prototypes are tools that serve the design process. More specifically, prototypes serve the form-giving process in designing.
In the practice of design, prototypes are used as important steps in the product development process. Prototypes serve the industry to test product aspects, change constructions and details, and to reach consensus within the company on the final form.
In mass production, prototypes are also used to test functionality and ergonomics. Changes that need to be made after the production preparation are often expensive and time-consuming. The final prototype thus serves for the preparation and planning of production. The first phase in the production process is called the null series: these first products (still a sort of prototypes) are used to test the production process.
Prototypes are used in the generation of ideas and concepts for three reasons:
- Generating and developing ideas and concepts
- Communicating ideas and concepts in design teams
- Testing and verifying ideas, concepts and solution principles.
Prototypes for Generating and Developing Ideas and Concept
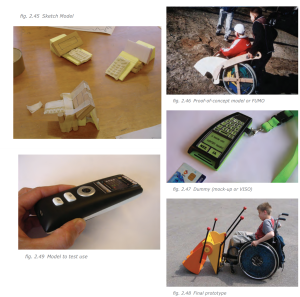
Sketch models (see figure 2.45) are kinds of prototypes that are used frequently in the phase of generating ideas and concepts. Simple materials are used, such as paper, cardboard, foam, wood, adhesives, wire and solder. Sketch models are tools that are used to visualize early ideas and to develop those early ideas into better ideas and concepts.
Often you see an iterative process between sketching, making sketch models, drawing, and making a second generation of sketch models.
Proof-of-concept prototypes (see figure 2.46) are used to verify whether certain technical principles actually work. Materials such as technical Lego, Meccano or Fisher Techniek (prototype material) can be used. Proof-of-concept prototypes are simplifications; often details are left out, and only rudimentary forms and working principles are built. Proof-of-concept prototypes are also called FUMO’s: Functional Models. Based on the moment in the idea generation phase, the level of detail is determined and the choice of materials. In the beginning of idea generation, prototypes are often built of paper, cardboard and foam. At the end of idea generation, prototypes of the concepts are made of foam, wood and metal.
A dummy (mock-up) (see figure 2.47) is a 1:1 scale model of the product idea. A dummy is a prototype that only has the external characteristics of the product idea, and not the technical working principles. It is often built at the end of the idea generation, to visualise and present final concepts. A dummy is also called a VISO: a Visual Model.
A detailed model is used in the concept generation phase to show particular details of the concept. A detailed model is much like a dummy; both are 1:1 scale models with predominantly external characteristics of high quality. A detailed model can also have some limited functionality.
A final model (see figure 2.48) often concludes the concept generation phase. The final model is a prototype that has a high-quality look, built of wood, metal or plastic, with real buttons and high-quality paint or finishing. The final model might also include some of the technical working principles.
Prototyping to Communicate Ideas and Concept in Design Teams
Prototypes are effective tools for communication purposes. When working in a team, prototypes help in building a shared understanding of the design problem and the solutions (ideas and concepts). Sketch models with increasing levels of detail help the development of product ideas and concepts within the team.
For the communication of ideas to parties outside the design process (for example stakeholders involved), prototypes are also a powerful tool. Often a dummy or a final model is used to present a product idea or product concept. Knowing the audience to whom you are presenting is important, though, in order to present an appropriate prototype built from the right materials and with the right techniques.
Prototyping to Test and Verify Ideas, Concept and Solution Principles
Prototypes also serve the purpose of testing and verifying ideas, concept or solution principles. (See figure 2.49, also see ‘Evaluation of Product Features’ in section 2.4).
There are generally three types of tests for which prototypes are used:
- Testing technical – functional characteristics of a product idea. Often a sketch model is used with some working functionality, or functioning technical principle, based on the goals of the test.
- Testing form characteristics. Often a detailed model is used for judging user preference.
- Testing usability characteristics. Often a final, working model is used for testing the intended usability of a product concept.
When Can You Use Three-dimensional Models?
Prototypes can be used throughout the conceptual design process. In the beginning of idea generation, various types of sketch models are used. During idea generation a dummy or detailed models are used, and the concept generation phase is often concluded with a final model.
How to Use Three-dimensional Models?
Starting Point
The starting point of building models can be a (mental) sketch of a product idea (sketch model) or detailed drawings and a building plan (final model).
Expected Outcome
The outcome of building models are threedimensional, tangible models of an idea, concept or solution principle.
Possible Procedure
- Three-dimensional model building starts with some notion of an idea, concept or solution principle.
- Based on the purpose of the model, some level of detail has to be determined prior to collecting materials, devising a plan and building the model. Simple sketch models at the beginning of idea generation only require a simple sketch, while final models (final prototypes) require a detailed plan of how to build the model.
- Collect the appropriate materials, such as paper, cardboard, wood, foam, adhesives, plastics, metals, wire, and paint.
- Devise a plan for building the model. For a simple sketch model, early idea sketches are often enough. Detailed or final prototypes usually require detailed drawing including dimensions.
- Build the prototype (see figure 2.45).
Tips and Tricks
- Look for examples of what different sketch models can look like. Sketch models as simple as paper and glue are often very helpful in the beginning of the idea generation. Try this yourself!
- Many examples can be found of final models, or detailed models. •
- Use the expertise of the people working in model workshops.
- Select your tools for model making well
References and Further Reading
Roozenburg, N.F.M. and Eekels, J. (1995) Product Design: Fundamentals and Methods, Utrecht: Lemma.
Roozenburg, N. and Eekels, J. (1998, 2nd ed.) Product Ontwerpen: Structuur en Methoden, Utrecht: Lemma.
Interested in Getting Better at Sketching?
Check out this and the following videos in the series. Like everything else, it take lots of repeated pactice!
